Unix Operating systems .
Unix Shell Programming
OBJECTIVES:
To learn the basics of UNIX OS, UNIX commands and File system.
To familiarize students with the Linux environment. To learn fundamentals of shell scripting and shell programming.
To be able to write simple programs using UNIX.
U1nit-1
Introduction: Unix Operating systems, Difference between Unix and other operating systems, Features and Architecture, Installation, Booting and shutdown process, System processes (an overview), External and internal commands, Creation of partitions in OS, Processes and its creation phases – Fork, Exec, wait, exit.
Unit-2
User Management and the File System: Types of Users, Creating users, Granting rights, User management commands, File quota and various file systems available, File System Management and Layout, File permissions, Login process, Managing Disk Quotas, Links (hard links, symbolic links)
Unit-3
Shell introduction and Shell Scripting: Shell and various type of shell, Various editors present in Unix, Different modes of operation in vi editor, Shell script, Writing and executing the shell script, Shell variable (user defined and system variables), System calls, Using system calls, Pipes and Filters.
Unit-4
Unix Control Structures and Utilities: Decision making in Shell Scripts (If else, switch), Loops in shell, Functions, Utility programs (cut, paste, join, tr, uniq utilities), Pattern matching utility (grep).
Unix Operating systems
Unit
-1
UNIX is a powerful Operating System initially developed by
Ken Thompson, Dennis Ritchie at AT&T Bell laboratories in 1970. It is
prevalent among scientific, engineering, and academic institutions due to its
most appreciative features like multitasking, flexibility, and many more. In
UNIX, the file system is a hierarchical structure of files and directories
where users can store and retrieve information using the files .
Multitasking: A UNIX operating
system is a multitasking operating system that allows you to initiate more than
one task from the same terminal so that one task is performed as a foreground
and the other task as a background process.
Multi-user: UNIX operating system supports more
than one user to access computer resources like main memory, hard disk, tape
drives, etc. Multiple users can log on to the system from different terminals
and run different jobs that share the resources of a command terminal. It deals
with the principle of time-sharing. Time-sharing is done by a scheduler that
divides the CPU time into several segments also called a time slice, and each
segment is assigned to each user on a scheduled basis. This time slice is tiny.
When this time is expired, it passes control to the following user on the
system. Each user executes their set of instructions within their time slice.
Portability: This feature
makes the UNIX work on different machines and platforms with the easy transfer
of code to any computer system. Since a significant portion of UNIX is written
in C language, and only a tiny portion is coded in assembly language for
specific hardware.
File Security and Protection: Being a
multi-user system, UNIX makes special consideration for file and system
security. UNIX has different levels of security using assigning username and
password to individual users ensuring the authentication, at the level
providing file access permission viz. read, write and execute and lastly file
encryption to change the file into an unreadable format.
Command Structure: UNIX commands are
easy to understand and simple to use. Example: "cp", mv etc. While
working in the UNIX environment, the UNIX commands are case-sensitive and are
entered in lower case.
Communication: In UNIX,
communication is an excellent feature that enables the user to communicate
worldwide. It supports various communication facilities provided using the
write command, mail command, talk command, etc.
Open Source: UNIX operating
system is open source it means it is freely available to all and is a
community-based development project.
Accounting: UNIX keeps an account of jobs
created by the user. This feature enhances the system performance in terms of
CPU monitoring and disk space checking. It allows you to keep an account of
disk space used by each user, and the disk space can be limited by each other.
You can assign every user a different disk quota. The root user can perform
these accounting tasks using various commands such as quota, df, du, etc.
UNIX Tools and Utilities: UNIX system
provides various types of tools and utilities facilities such as UNIX grep, sed
and awk, etc. Some of the general-purpose tools are compilers, interpreters,
network applications, etc. It also includes various server programs which
provide remote and administration services.
While working with UNIX OS, several layers of this system
provide interaction between the pc hardware and the user. Following is the
description of each and every layer structure in UNIX system:
Architecture of
UNIX operating system with diagram

TABLE OF CONTENTS
- LAYER 1 – The Hardware
- LAYER 2 – The Kernel
- LAYER 3 – The Shell/ System Call
Interface
- LAYER 4 – Application Programs/
Libraries
- PROPERTIES of UNIX operating
syste
Layer-1: Hardware -
This layer of UNIX consists of all
hardware-related information in the UNIX environment.
Layer-2: Kernel -
The core of the operating system
that's liable for maintaining the full functionality is named the kernel. The
kernel of UNIX runs on the particular machine hardware and interacts with the
hardware effectively.
It also works as a device manager and performs valuable
functions for the processes which require access to the peripheral devices
connected to the computer. The kernel controls these devices through device
drivers.
The kernel also manages the memory. Processes are executed
programs that have owner's humans or systems who initiate their execution.
The system must provide all processes with access to an adequate
amount of memory, and a few processes require a lot of it. To make effective
use of main memory and to allocate a sufficient amount of memory to every
process. It uses essential techniques like paging, swapping, and virtual
storage.
Layer-3: The Shell -
The Shell is an interpreter that
interprets the command submitted by the user at the terminal, and calls the
program you simply want.
It also keeps a history of the list
of the commands you have typed in. If you need to repeat a command you typed
it, use the cursor keys to scroll up and down the list or type history for a
list of previous commands. There are various commands like cat, mv, cat, grep,
id, wc, and many more.
Types of Shell in UNIX System:
- Bourne Shell: This Shell is simply
called the Shell. It was the first Shell for UNIX OS. It is still the most
widely available Shell on a UNIX system.
- C Shell: The C shell is another popular shell
commonly available on a UNIX system. The C shell was developed by the
University of California at Berkeley and removed some of the shortcomings
of the Bourne shell.
- Korn Shell: This Shell was created by David Korn to
address the Bourne Shell's user-interaction issues and to deal with the
shortcomings of the C shell's scripting quirks.
Layer-4: Application Programs Layer -
It is the outermost layer that
executes the given external applications. UNIX distributions typically come
with several useful applications programs as standard. For Example: emacs
editor, StarOffice, xv image viewer, g++ compiler etc.
Difference
between Unix and other operating systems

Difference between
UNIX and Windows Operating System :
|
S. No. |
Parameters |
UNIX |
Windows |
|
1. |
Licensing |
It is an open-source system which can be used to under General Public
License. |
It is a proprietary software owned by Microsoft. |
|
2. |
User Interface |
It has a text base interface, making it harder to grasp for newcomers. |
It has a Graphical User Interface, making it simpler to use. |
|
3. |
Processing |
It supports Multiprocessing. |
It supports Multithreading. |
|
4. |
File System |
It uses Unix File System(UFS) that comprises STD.ERR and STD.IO file
systems. |
It uses File Allocation System (FAT32) and New technology file
system(NTFS). |
|
5. |
Security |
It is more secure as all changes to the system require explicit user
permission. |
It is less secure compared to UNIX. |
|
6. |
Data Backup & Recovery |
It is tedious to create a backup and recovery system in UNIX, but it
is improving with the introduction of new distributions of Unix. |
It has an integrated backup and recovery system that make it simpler
to use. |
|
8. |
Hardware |
Hardware support is limited in UNIX system. Some hardware might not
have drivers built for them. |
Drivers are available for almost all the hardware. |
|
9. |
Reliability |
Unix and its distributions are well known for being very stable to
run. |
Although Windows has been stable in recent years, it is still to
match the stability provided by Unix systems. |
Features of
the UNIX Operating System
High
reliability, scalability and powerful features make UNIX a popular operating
system, according to Intel. Now beyond its 40th year as of 2010, UNIX is the
backbone of many data centers including the Internet. Big players using UNIX
include Sun Microsystems, Apple Inc., Hewlett-Packard and AT&T, which is
the original parent company of UNIX. The Open Group owns all UNIX
specifications and the trademark, which are freely accessible and available
over the Internet.
Multitasking and Portability
The main features of UNIX include multiuser, multitasking and
portability capabilities. Multiple users access the system by connecting to
points known as terminals. Several users can run multiple programs or processes
simultaneously on one system. UNIX uses a high-level language that is easy to
comprehend, modify and transfer to other machines, which means you can change
language codes according to the requirements of new hardware on your computer.
You, therefore, have the flexibility to choose any hardware, modify the UNIX
codes accordingly and use UNIX across multiple architectures.
The Kernel and the Shell
The hub of a UNIX operating system, the kernel manages the applications
and peripherals on a system. Together, the kernel and the shell carry out your
requests and commands. You communicate with your system through the UNIX shell,
which translates to the kernel. When you turn on your terminal, a system
process starts that overlooks your inputs. When you enter your password, the
system associates the shell program with your terminal. The shell allows you to
customize options even if you are not technically savvy. For example, if you
partially type a command, the shell anticipates the command for which you are
aiming and displays the command for you. The UNIX shell is a program that gives
and displays your prompts and, in conjunction with the kernel, executes your
commands. The shell even maintains a history of the commands you enter,
allowing you to reuse a command by scrolling through your history of commands.
Files and Processes
All the functions in UNIX involve either a file or a process. Processes
are executions of programs, while files are collections of data created by you.
Files may include a document, programming instructions for the system or a directory.
UNIX uses a hierarchical file structure in its design that starts with a root
directory--signified by the forward slash (/). The root is followed by its
subdirectories, as in an inverted tree, and ends with the file. In the example
"/Demand/Articles/UNIX.doc," the main directory "Demand"
has a subdirectory "Articles," which has a file "UNIX.doc."
Installation
of Unix os
Step 1: Before You
Install
Before you run the
MathWorks Installer:
• Make sure you
have created a License File using the licensing information
that you received
from The MathWorks via e-mail when you purchased your
software. See
“Product Licensing” on page 1-28 for more information.
• Make sure your
system satisfies the requirements of the software you intend
to install. For
more information, see “System Requirements” on page 1-32.
Installation
Procedure
“Step 1: Before You
Install” on page 1-3
“Step 2: Log In to
the System” on page 1-4
“Step 3: Insert
Product CD or Download Product Files” on page 1-4
“Step 4: Create the
Installation Directory” on page 1-5
“Step 5: Put the
License File in the Installation Directory” on page 1-5
“Step 6: Start the
Installer” on page 1-6
“Step 7: Review the
License Agreement” on page 1-7
“Step 8: Verify the
Installation Directory Name” on page 1-7
“Step 9: Verify the
License File” on page 1-8
“Step 10: Specify
the Products to Install” on page 1-9
“Step 11: Specify
Location of Symbolic Links” on page 1-11
“Step 12: Begin the
Installation” on page 1-11
“Step 13: Exit the
Installer” on page 1-12
1 Standard UNIX
Installation Procedure
1-4
Step 2: Log In to
the System
Log in to the
system on which you want to install MATLAB. Superuser status
is required to
install the symbolic links that add MATLAB to your users’ paths
and to edit the
system boot script to start the MATLAB license manager
automatically at
system boot time. If you do not have superuser status, you can
still install
MATLAB, but MATLAB programs must be invoked using absolute
pathnames. You can
also set up these links after the installation is complete.
Note If you have
superuser status and you are performing an installation for
another user, you
will need to update the FLEXlm options file after the
installation is
complete. See “Setting Up Network Named User Licensing” on
page 1-14 for information
about updating the installation options file.
Step 3: Insert
Product CD or Download Product Files
Insert CD 1 into
the CD-ROM drive connected to your system or download
product files from
the MathWorks Web site. If your system requires that you
mount the CD-ROM
drive you intend to use to install MATLAB, see “Mounting
a CD-ROM Drive”. If
you are downloading product files over the Internet, save
the files to a
temporary location, called $TEMP in this documentation. See the
downloads page for
detailed instructions.
Mounting a CD-ROM
Drive
To mount a CD-ROM
drive, perform this procedure:
1 Create a
directory to be the mount point for the CD-ROM drive. For
example:
mkdir /cdrom
2 Put CD 1 in the
CD-ROM drive with the label face up. If your CD-ROM drive
requires placing
the CD in a caddy before inserting it into the drive, make
sure the arrow on
the caddy is pointing towards the CD-ROM drive.
3 Execute the
command to mount the CD-ROM drive on your system. You can
install the
software from either a locally mounted CD-ROM drive or from a
remotely mounted
CD-ROM drive. For more information about these
options, see
“Mounting a CD-ROM Drive Remotely” on page 1-35.
Installing MATLAB
1-5
Note Do not move to
the newly mounted CD-ROM directory. Depending on
which products you
are installing, the installer might require you to insert
another product CD
during installation.
Step 4: Create the
Installation Directory
Create the
installation directory and move to it, using the cd command. For
example, to install
into the location /usr/local/matlab704, use these
commands.
cd /usr/local
mkdir matlab704 %
Needed for first time installation only
cd matlab704
You can specify any
name for the installation directory. However, do not specify
a directory name
that contains an at (@) sign or a dollar ($) sign. Also, do not
include a directory
named private as part of the installation path. Subsequent
instructions in
this book refer to this directory as $MATLAB.
Note Do not install
MATLAB 7.0.4 over any previous released version of
MATLAB.
Step 5: Put the
License File in the Installation
Directory
Move your License
File, named license.dat, into the $MATLAB directory. The
installer looks for
the License File in the $MATLAB directory and, after
processing it, moves
the License File to $MATLAB/etc during installation. For
more information
about License Files, see “Creating a License File” on
page 1-29.
1 Standard UNIX
Installation Procedure
1-6
Note If you are
upgrading an existing MATLAB installation, rename the
License File in
$MATLAB/etc. The installer will not process the new License
File if it finds an
existing License File in $MATLAB/etc.
Step 6: Start the
Installer
If you are
installing from a CD, execute the appropriate command to run the
MathWorks Installer
on your platform.
/cdrom/install*
& (Sun and Linux platforms)
/cdrom/INSTALL*
& (HP platform)
If you are
installing from downloaded files, extract the installer in the $TEMP
directory. For
example, on Linux systems run the following command.
tar -xf boot.ftp
Once you have
expanded all the installer files in the $TEMP directory, execute
the appropriate
command to run the MathWorks installer on your platform.
./install
The installer
displays the following welcome screen.
Installing MATLAB
1-7
Step 7: Review the
License Agreement
Accept or reject
the software licensing agreement displayed. If you accept the
terms of the
agreement, click Yes to proceed with the installation.
Step 8: Verify the
Installation Directory Name
Verify the name of
the installation directory in the MATLAB Root Directory
dialog box and then
click OK to continue.
1 Standard UNIX
Installation Procedure
1-8
Step 9: Verify the
License File
Verify your License
File in the License File dialog box and click OK. If you
didn’t put a copy
of your License File in your $MATLAB directory, the installer
displays a License
File template. You can modify this template to create a valid
License File.
When verifying your
License File:
• Make sure that
the expiration date, number of keys, and passcode fields in
each INCREMENT line
match the license information you received from The
MathWorks.
• Delete INCREMENT
lines for products with expired licenses. (This avoids the
warning messages
that appear in your log file when you start MATLAB.)
• Make sure that
your e-mail program did not cause INCREMENT lines to wrap.
You must use the
continuation character (\) if INCREMENT lines get too long
to fit on one line.
• Do not use tabs
to separate the fields in an INCREMENT line.
Installing MATLAB
1-9
You can edit the
License File in the text window displayed. If you want to use
another text
editor, click Cancel. Note, however, that you must edit the
processed version
of the License File, $MATLAB/etc/license.dat, not the
version of the
License File you placed in the top-level installation directory in
Step 5.
Step 10: Specify
the Products to Install
Specify the
products you want to install in the Installation Options dialog box
and then click OK
to continue.
The installer
includes the documentation, in compressed form, with each
product it
installs. The installer does not install product documentation in PDF
format; this is
available at the MathWorks Web site.
Note The installer
might display a message box stating that one or more of
your licensed
products are not available on the CDs. To obtain products that
have been released
since this set of CDs was produced, visit the MathWorks
Web site,
www.mathworks.com, and download them. Click Close to continue
with the
installation.
1 Standard UNIX
Installation Procedure
1-10
By default, the
installer lists all the products that you are licensed to install in
the Items to
install pane of this dialog box. If you do not want to install an
item, select it and
click the Remove button. This moves the product name into
the Items not to
install pane. A MATLAB installation must include MATLAB
and the MATLAB
Toolbox selections. The license manager (FLEXlm) selection
appears at the end
of the list.
The Platforms
column identifies which product binary files are installed. By
default, the check
box identifying the platform on which you are running the
installer is
preselected. If you want to install product binary files for additional
platforms, select
them in the Platforms column.
Installing MATLAB
1-11
Step 11: Specify
Location of Symbolic Links
Specify where you
want to put symbolic links to the matlab and mex scripts in
the Installation
Data dialog box. Choose a directory such as /usr/local/bin
that is common to
all your users’ paths. Click OK to continue with the
installation.
Step 12: Begin the
Installation
The installer
displays the Begin Installation dialog box. Click OK to begin the
installation.
After you click OK,
the installer displays a dialog box indicating the progress
of the installation.
Depending on the
products you have selected, the installer might prompt you
to insert another
CD in your CD-ROM drive. The figure below shows this dialog
box for CD 2. After
switching the CDs, click OK to continue with the
installation. If
you do not want to install these products, click the skip button
(Skip CD 2 in the
figure). You can always install the products later.
1 Standard UNIX
Installation Procedure
1-12
Step 13: Exit the
Installer
After the
installation is complete, the installer displays the Installation
Complete dialog
box. This dialog box informs you of some optional,
post-installation
setup and configuration steps you might want to perform. See
“After You Install”
on page 1-14 for more information. Click Exit to dismiss the
installer.
Booting and Shutdown
From Power-on to Working System
The sequence of steps to move a
computer from the state of turned – off to a working operating system is
commonly called boot strapping. We start with nothing and incrementally
give the computer more functionality. We will not concern ourselves here with
matters of POST, BIOS and set-up data. The BIOS loads a Boot Loader program
from the master boot record (MBR) of the active partition. The Boot Loader
program loads and starts the operating system, so this is where we’ll begin.
Boot Loader
Before discussing boot loaders, we
should note that many modern Linux distributions place the Linux kernel and
other needed files on a small partition that usually becomes the /boot/ directory on
the booted system. This partition uses a basic file system, such as ext4, that
the boot loader can read. Then once the kernel is loaded, it will be capable of
working with more advanced file systems, such as LVM, for the root file system
partition.
Older Linux systems used LILO as the
boot loader. Newer systems use GRUB. Both will allow the user to pick between
booting different Linux kernels or root file systems and can also boot
different operating systems, such as Windows. The user may also the boot loader
to pass arguments to the kernel, such as to boot into single user mode.
GRUB
This just describes the basics. For
advanced configuration or usage, please seek more detailed documentation.
Most Linux distribution installers will
install GRUB, so it is usually not necessary to install it. If you already have
a Windows partition, the installer will also add an entry for booting Windows.
The configuration file for GRUB is
usually /boot/grub/menu.1st. Here is a quick example showing a
normal Linux boot option, booting to single user mode, and booting an alternate
kernel.
default 0
title Linux (2.4.9-21)
root (hd0,0)
kernel /vmlinuz-2.4.9-21 ro root=/dev/hda6
initrd /initrd-2.4.9-21.img
title Linux (2.4.9-21) single user mode
root (hd0,0)
kernel /vmlinuz-2.4.9-21 ro root=/dev/hda6 s
initrd /initrd-2.4.9-21.img
title Linux (2.4.9-23)
root (hd0,0)
kernel /vmlinuz-2.4.9-23 ro root=/dev/hda6
initrd /initrd-2.4.9-23.img
In the example above, the three title lines
give the boot options that the user will see.
The default line
specifies which of the options will be used if the user does not interact at
boot time. The boot options are numbered starting at zero.
The root line tells
which file system is the boot partition. Note that this is the file system that
hold kernel image, which is usually /boot after the
system is booted. In this example, hd0,0 means the first
partition of the first hard drive.
The kernel line gives
the path to the Linux kernel file relative to the boot partition. Extra
information on the line are passed as boot parameters to the kernel.
The initrd line
specifies the path to an image file with kernel modules that might be needed
for booting the system. Note that the booted system will load kernel modules
from the /lib/modules directory, so this is not the
same. The modules loaded from the initrd line are needed to boot the system.
One example of such a module to load would be if the root file system will use
a non-standard file system such as Brtfs, so Brtfs drivers will be needed to
boot the system.
GRUB Command Line
If additional parameters need to be
passed to kernel at boot time, the user may select to edit one of the command
from the configuration file. A common choice would be to add the s to the end of
the kernel line.
GRUB 2
Some Linux systems have a newer version
of GRUB. GRUB 2 is intended to require less effort by the user to maintain. It
main configuration file, /boot/grub/grub.cfg is not meant to
be directly edited, but rather is automatically generated by a set of shell
scripts. The shell scripts used by GRUB 2 are contained in the /etc/grub.d/ directory. The
main file of interest to users in this directory is 40_custom, which may be used
to store custom menu entries and directives.
Service Starting and System
Monitoring
After the kernel is loaded, the system
can start the process of starting needed services and daemons so that we have a
usable system. From the beginning days of Unix until just a few years ago, this
was done by a program called init. The init program
started a sequence of shell scripts that configured the system and started
daemon programs. After the system was completely booted, the role of init was
mostly restricted to process monitoring.
In response to new hardware and the
capabilities of more consumer oriented operating systems, such as Windows and
Machintosh, many in the Linux community felt that init was not
proactive enough. In particular, they felt that it should be able to detect
changes to the hardware environment, such as devices (jump drives) being
plugged into the USB bus or network cables removed or plugged in. Thus a
program called upstart was first released in 2006 to
replace init. Then in 2010, a program called systemd was
released as another replacement to init. It appears now that systemd will
be the predominant system management tool of the near future; although, this is
not without significant controversy.
The upstart program is
mostly compatible with the traditional init configuration
files, but systemd breaks with backwards compatibility
with init.
init and upstart
The first configuration file consulted
by both init and upstart is /etc/inittab. This file contains
a line where the default run level (discussed below) of the system is defined.
The most common default run levels are 3 and 5. The following line defines the
default run level to be 5:
id:5:initdefault:
The traditional init program
also allowed commands in inittab to define process monitoring
actions, such as to respawn certain processes if they terminate. Upstart only
uses inittab to define the default run
level. Systemd does not use the file.
During system boot, the shell script
found at /etc/rc.d/rc is executed. It sequentially runs
other shell scripts to start the services and daemons needed to move the system
to the default run level.
Run Levels
Each service or daemon has a shell
script in the /etc/rc.d/init.d/ directory that can be invoked to
start, stop, restart, reload, or report the status of the service. Then in the
directories corresponding to the run levels /etc/rc.d/rc0.d/, /etc/rc.d/rc1.d/, ![]() , /etc/rc.d/rc6.d/ are symbolic
links (in Solaris they are hard links) to the files in /etc/rc.d/init.d/. The presence of the
links in these directories specify which are run when moving to the run level.
The names of the links begin with either an S or a K followed by a
number. When /etc/rc.d/rc moves to a run level, it first
runs the K scripts in numerical order passing each
the stop command in case some programs are
already running. Then it runs the S scripts in order passing
the start command to each. Essential
services, such as networking, have smaller numbers so that they are started
before services that depend on the essential services are started.
, /etc/rc.d/rc6.d/ are symbolic
links (in Solaris they are hard links) to the files in /etc/rc.d/init.d/. The presence of the
links in these directories specify which are run when moving to the run level.
The names of the links begin with either an S or a K followed by a
number. When /etc/rc.d/rc moves to a run level, it first
runs the K scripts in numerical order passing each
the stop command in case some programs are
already running. Then it runs the S scripts in order passing
the start command to each. Essential
services, such as networking, have smaller numbers so that they are started
before services that depend on the essential services are started.
|
Run level |
systemd Targets |
Description |
|
0 |
poweroff.target |
Halt the system |
|
1 |
rescue.target |
Enter single-user mode |
|
2 |
runlevel2.target |
Multiuser mode, but without NFS |
|
3 |
multi-user.target |
Full multiuser mode |
|
4 |
runlevel4.target |
Unused |
|
5 |
grapical.target |
Run level 3 with graphical
interface |
|
6 |
reboot.target |
Reboot the system |
chkconfig Command
The chkconfig updates
and queries runlevel information for system services.
SYNOPSIS
chkconfig [–list] [–type type][name]
chkconfig –add name
chkconfig –del name
chkconfig –override name
chkconfig [–level levels] [–type type]
name <on|off|reset|resetpriorities>
chkconfig [–level levels] [–type type]
name
DESCRIPTION
chkconfig provides a simple
command-line tool for maintaining the /etc/rc[0-6].d directory hierarchy by
relieving system administrators of the task of directly manipulating the
numerous symbolic links in those directories.
chkconfig has five distinct functions:
adding new services for management, removing services from management, listing
the current startup information for services, changing the startup information
for services, and checking the startup state of a particular service.
RUNLEVEL FILES
Each service which should be manageable
by chkconfig needs two or more commented lines added to its init.d script. The
first line tells chk- config what runlevels the service should be started in by
default, as well as the start and stop priority levels. For example: #
chkconfig: 2345 20 80
This says that the script should be
started in levels 2, 3, 4, and 5, that its start priority should be 20, and
that its stop priority should be 80.
service Command
The shell scripts in /etc/rc.d/init.d/ may be invoked
manually and passed commands such as: stop, start, restart, reload,
and status. As a convenience, the service command
may be run from any directory with the same commands.
SYNOPSIS
service SCRIPT COMMAND [OPTIONS]
service –status-all
service –help | -h | –version
The supported values of COMMAND depend
on the invoked script, service passes COMMAND and OPTIONS it to the init script
unmodified. All scripts should support at least the start and stop commands. As
a special case, if COMMAND is –full-restart, the script is run twice, first
with the stop command, then with the start command.
service --status-all runs all init
scripts, in alphabetical order, with the status command.
Systemd
This Fedora web page seems to have some good
documation about basic administration of services with systemd.
System
processes in unix
In this chapter, we will discuss in detail about process
management in Unix. When you execute a program on your Unix system, the system
creates a special environment for that program. This environment contains
everything needed for the system to run the program as if no other program were
running on the system.
Whenever you issue a command in Unix, it creates, or starts, a new
process. When you tried out the ls command to list the
directory contents, you started a process. A process, in simple terms, is an
instance of a running program.
The operating system tracks processes through a five-digit ID
number known as the pid or the process ID. Each
process in the system has a unique pid.
Pids eventually repeat because all the possible numbers are used
up and the next pid rolls or starts over. At any point of time, no two
processes with the same pid exist in the system because it is the pid that Unix
uses to track each process.
Starting a Process
When you start a
process (run a command), there are two ways you can run it −
- Foreground Processes
- Background Processes
Foreground Processes
By default, every
process that you start runs in the foreground. It gets its input from the keyboard
and sends its output to the screen.
You can see this
happen with the ls command. If you wish to list all the files
in your current directory, you can use the following command −
$ls ch*.doc
This would display
all the files, the names of which start with ch and end
with .doc −
ch01-1.doc
ch010.doc ch02.doc ch03-2.doc
ch04-1.doc
ch040.doc ch05.doc ch06-2.doc
ch01-2.doc
ch02-1.doc
The process runs in
the foreground, the output is directed to my screen, and if the ls command
wants any input (which it does not), it waits for it from the keyboard.
While a program is
running in the foreground and is time-consuming, no other commands can be run
(start any other processes) because the prompt would not be available until the
program finishes processing and comes out.
Background Processes
A background process
runs without being connected to your keyboard. If the background process
requires any keyboard input, it waits.
The advantage of
running a process in the background is that you can run other commands; you do
not have to wait until it completes to start another!
The simplest way to
start a background process is to add an ampersand (&) at the end of
the command.
$ls ch*.doc &
This displays all
those files the names of which start with ch and end
with .doc −
ch01-1.doc
ch010.doc ch02.doc ch03-2.doc
ch04-1.doc
ch040.doc ch05.doc ch06-2.doc
ch01-2.doc
ch02-1.doc
Here, if the ls command
wants any input (which it does not), it goes into a stop state until we move it
into the foreground and give it the data from the keyboard.
That first line
contains information about the background process - the job number and the
process ID. You need to know the job number to manipulate it between the
background and the foreground.
Press the Enter key
and you will see the following −
[1] + Done ls ch*.doc &
$
The first line tells
you that the ls command background process finishes
successfully. The second is a prompt for another command.
Listing Running Processes
It is easy to see
your own processes by running the ps (process status) command
as follows −
$ps
PID
TTY TIME CMD
18358
ttyp3 00:00:00 sh
18361
ttyp3 00:01:31 abiword
18789
ttyp3 00:00:00 ps
One of the most
commonly used flags for ps is the -f ( f for full) option,
which provides more information as shown in the following example −
$ps -f
UID
PID PPID C STIME TTY
TIME CMD
amrood 6738
3662 0 10:23:03 pts/6 0:00 first_one
amrood 6739
3662 0 10:22:54 pts/6 0:00 second_one
amrood 3662
3657 0 08:10:53 pts/6 0:00 -ksh
amrood 6892
3662 4 10:51:50 pts/6 0:00 ps -f
Here is the
description of all the fields displayed by ps -f command −
|
Sr.No. |
Column & Description |
|
1 |
UID User ID that this
process belongs to (the person running it) |
|
2 |
PID Process ID |
|
3 |
PPID Parent process ID
(the ID of the process that started it) |
|
4 |
C CPU utilization of
process |
|
5 |
STIME Process start time |
|
6 |
TTY Terminal type
associated with the process |
|
7 |
TIME CPU time taken by
the process |
|
8 |
CMD The command that
started this process |
There are other
options which can be used along with ps command −
|
Sr.No. |
Option & Description |
|
1 |
-a Shows information
about all users |
|
2 |
-x Shows information
about processes without terminals |
|
3 |
-u Shows additional
information like -f option |
|
4 |
-e Displays extended
information |
Stopping Processes
Ending a process can
be done in several different ways. Often, from a console-based command, sending
a CTRL + C keystroke (the default interrupt character) will exit the command.
This works when the process is running in the foreground mode.
If a process is
running in the background, you should get its Job ID using the ps command.
After that, you can use the kill command to kill the process
as follows −
$ps -f
UID
PID PPID C STIME TTY
TIME CMD
amrood 6738
3662 0 10:23:03 pts/6 0:00 first_one
amrood 6739
3662 0 10:22:54 pts/6 0:00 second_one
amrood 3662
3657 0 08:10:53 pts/6 0:00 -ksh
amrood 6892
3662 4 10:51:50 pts/6 0:00 ps -f
$kill 6738
Terminated
Here, the kill command
terminates the first_one process. If a process ignores a
regular kill command, you can use kill -9 followed by the
process ID as follows −
$kill -9 6738
Terminated
Parent and Child Processes
Each unix process has
two ID numbers assigned to it: The Process ID (pid) and the Parent process ID
(ppid). Each user process in the system has a parent process.
Most of the commands
that you run have the shell as their parent. Check the ps -f example
where this command listed both the process ID and the parent process ID.
Zombie and Orphan Processes
Normally, when a
child process is killed, the parent process is updated via a SIGCHLD signal.
Then the parent can do some other task or restart a new child as needed.
However, sometimes the parent process is killed before its child is killed. In
this case, the "parent of all processes," the init process,
becomes the new PPID (parent process ID). In some cases, these processes are
called orphan processes.
When a process is
killed, a ps listing may still show the process with a Z state.
This is a zombie or defunct process. The process is dead and not being used.
These processes are different from the orphan processes. They have completed
execution but still find an entry in the process table.
Daemon Processes
Daemons are
system-related background processes that often run with the permissions of root
and services requests from other processes.
A daemon has no
controlling terminal. It cannot open /dev/tty. If you do a "ps
-ef" and look at the tty field, all daemons will
have a ? for the tty.
To be precise, a
daemon is a process that runs in the background, usually waiting for something
to happen that it is capable of working with. For example, a printer daemon
waiting for print commands.
If you have a program
that calls for lengthy processing, then it’s worth to make it a daemon and run
it in the background.
The top Command
The top command
is a very useful tool for quickly showing processes sorted by various criteria.
It is an interactive
diagnostic tool that updates frequently and shows information about physical
and virtual memory, CPU usage, load averages, and your busy processes.
Here is the simple
syntax to run top command and to see the statistics of CPU utilization by
different processes −
$top
Job ID Versus Process ID
Background and
suspended processes are usually manipulated via job number (job ID).
This number is different from the process ID and is used because it is shorter.
In addition, a job
can consist of multiple processes running in a series or at the same time, in
parallel. Using the job ID is easier than tracking individual processes.
External
and internal commands in unix ,
The UNIX system is command-based i.e things happen because of the commands that you
key in. All UNIX commands are seldom more than four characters long.
They are grouped into two categories:
·
Internal Commands : Commands
which are built into the shell. For all the shell built-in commands, execution
of the same is fast in the sense that the shell doesn’t have to search the
given path for them in the PATH variable, and also no process needs to be
spawned for executing it.
Examples: source, cd, fg, etc.
·
External Commands : Commands
which aren’t built into the shell. When an external command has to be executed,
the shell looks for its path given in the PATH variable, and also a new process
has to be spawned and the command gets executed. They are usually located in
/bin or /usr/bin. For example, when you execute the “cat” command, which
usually is at /usr/bin, the executable /usr/bin/cat gets executed.
Examples: ls, cat etc.
List of Internal Commands for linux:
alias: This command allows you to define
commands of your own, or replace existing ones. For example, 'alias rm=rm -i'
will make rm interactive so you don't delete any files by mistake.
alias command tells
the shell to replace one string with another string while executing the
commands.
·
alias [-p]
[name[=value] ... ]
break: Used mostly in shell scripting to
break the execution of a loop
·
break [n]
cd: Change directory. For example, 'cd
/usr' will make the current directory be /usr. See also pwd.
· cd [directory]
continue: Used mostly in shell scripting to
continue the execution of a loop
· continue [N]
echo: List the value of variables,
either environment-specific or user-declared ones, but can also display a simple
string.
· echo [option] [string]
export: Allows the user to export certain
environment variables, so that their values are used to all subsequent
commands
· export [-f] [-n] [name[=value] ...] or export -p
fg: Resume the execution of a
suspended job in the foreground. See also bg.
history: With no arguments, gives a numbered list
of previously issued commands. With arguments, jumps to a certain number
in said list.
kill: Send a termination signal by default, or whatever signal
is given as an option, to a process ID.
pwd: Print working directory
read: Used mostly in scripts, it is used to get input from the
user or another program
test: Used with an expression as an argument, it returns 0 or
1, depending on the evaluation of said expression
times: Print the accumulated user and system times for the
shell and for processes run from the shell. The return status is 0.
type: Indicates what kind of command is
the argument taken.
unalias: The unalias
command is used to remove entries from the current user's list of
aliases. unalias removes aliases created during the current
login session. It also suppresses permanent aliases; however, they are affected
only for the current login session and are restored after the user logs in
again.
wait: Usually given a process id, it waits until said process
terminates and returns its status.
bg: The bg command is
part of Linux/Unix shell job control. The command may
be available as both internal and external command. It resumes
execution of a suspended process as if they had been started with &.
Use bg command to restart a stopped background process
bind: bind command is Bash shell builtin command.
It is used to set Readline key bindings and variables. The keybindings are the
keyboard actions that are bound to a function. So it can be used to change how
the bash will react to keys or combinations of keys, being pressed on the
keyboard.
builtin: builtin
command is used to run a shell builtin, passing it arguments(args), and also to
get the exit status. The main use of this command is to define a shell function
having the same name as the shell builtin by keeping the functionality of the
builtin within the function.
caller: Caller is a builtin command that returns the context
(localization) of any active subroutine call (a shell function or a script executed with
the . or source builtins.
cd
command
compgen
complete
compopt
continue
declare
dirs
disown
echo
enable
eval
exec
exit
export
false
fc
fg
getopts
hash
help
history
jobs
kill
let
local
logout
mapfile
popd
printf
pushd
pwd
read
readarray
readonly
return
set
shift
shopt
External
Commands :
External commands are known as Disk residence commands.
Because they can be store with DOS directory or any disk which is used for
getting these commands. Theses commands help to perform some specific task.
These are stored in a secondary storage device. Some important external
commands are given below-
1. MORE:-Using TYPE command we can see the
content of any file. But if length of file is greater than 25 lines then
remaining lines will scroll up. To overcome through this problem we uses MORE
command. Using this command we can pause the display after each 25 lines.
Syntax:- C:\> TYPE <File name> | MORE
C:\> TYPE ROSE.TXT | MORE
or
C:\> DIR | MORE
2. MEM:-This command displays free and used
amount of memory in the computer.
Syntax:- C:\> MEM
the computer will display the amount of memory.
3. SYS:- This command is used for copy
system files to any disk. The disk having system files are known as Bootable
Disk, which are used for booting the computer.
Syntax:- C:\> SYS [Drive name]
C:\> SYS A:
System files transferred
This command will transfer the three main system files COMMAND.COM,
IO.SYS, MSDOS.SYS to the floppy disk.
4. XCOPY:- When we need to copy a
directory instant of a file from one location to another the we uses xcopy
command. This command is much faster than copy command.
Syntax:- C:\> XCOPY < Source dirname > <Target
dirname>
C:\> XCOPY TC TURBOC
5. MOVE:- Move command is used for
moving one file or multiple files from one location to another location or from
one disk to another disk.
Syntax:- C:\> MOVE <file name> <path name>
C:\SONGS> MOVE *.MP3 C:\ SONGS\OLD SONGS\
C:\>
6. FC:-(File Compare) This
command is capable for comparing two set of files and display difference
between two files.
Syntax:- C:\> FC <First set of file> <Second set of
file>
C:\> FC ROSE.TXT GULAB.TXT
7.CHKDSK:-(Check disk) - This
command is used to check the status of a disk and show the report of result
status.
Syntax:- C:\> CHKDSK
|
C:\>CHKDSK |
8. SORT:- This command is useful when
we want to sort a file. When we run this command the result can be get to
display device or file.
Syntax:- C:\> SORT /R < Input file name> <output
file name>
Suppose we have a file Player.txt which having the list of a cricket player
team and we want to sort the list of players, then we uses this command
C:\> SORT Player.txt
If we not specify the output file name then result will show to the
screen.
/R- switch is used for sorting the file in descending order like from Z
to A or from 9 to 0.
9. FIND:- The FIND command is used to
search a file for a text string.
Syntax:- C:\> FIND "String to search" <File name>
C:\TEST>find "office" gulab.txt
---------- gulab.txt
A clock in a office can never get stolen
10. DISKCOPY:- DISKCOPY copies the
contents of a floppy disk to another.
Syntax:- C:\> DISKCOPY <Drive1> <Drive2>
C:\> DISKCOPY A: B:
This command will be copy all contents of A drive to B drive.
11. ATTRIB:- Sets the various type
of attribute to a file. Like Read only, Archive, Hidden and System attribute.
Syntax:- C:\> ATTRIB [± r] [± a] [± h] [± s] <File name>
here r - for read only, a- for archive, h -
for hidden, s - for hidden attribute.
C:\> ATTRIB +r Gulab.txt
This command will change the attribute of file gulab.txt to read only
mode. To remove the read only attribute we will follow this command.
C:\> ATTRIB -r Gulab.txt
12. LABEL:- If you are not happy with
the volume label of hard disk, you can change it.
Syntax:- C:\> LABEL
C:\>LABEL
Volume in drive C is JAI
Volume Serial Number is 3E42-1907
Volume label (11 characters, ENTER for none)? INFOWAY
13. DOSKEY:- Once we install doskey
, our dos will star to memorize all commands we uses. We can recall those
commands using up or down arrow keys. It also gives the facility to create
macros, which creates a short key for long keyword or command.
Key function for Doskey are given as-
|
UP,DOWN |
arrows recall commands |
|
Esc |
clears current command |
|
F7 |
displays command history |
|
Alt+F7 |
clears command history |
|
F9 |
selects a command by number |
|
Alt+F10 |
clears macro definitions |
Syntax:- C:\> DOSKEY
DOSKey installed
Creating Macros:-
C:\>doskey t=time
C:\>t
C:\>time
Current time is 3:39:05.97p
Enter new time:
To list out all macros defined just type DOSKEY/MACROS at dos prompt and press
enter.
C:\>DOSKEY/MACROS
$D=date
T=time
14. FORMAT:- This command creates
new Track & Sectors in a disk. Every
Syntax:- C:\> FORMAT [drive name] [/S]
C:\> FORMAT A:
this command will create new track & sectors.
C:\> FORMAT A: /S
This command will transfer system files after formatting the disk.
Creation of partitions in OS in unix
Option 1:
Partition a Disk
Using parted Command
Follow the steps below to partition a
disk in Linux by using the parted command.
Step 1: List
Partitions
Before making a partition, list
available storage devices and partitions. This action helps identify the
storage device you want to partition.
Run the following command with sudo to
list storage devices and partitions:
sudo parted -l
The terminal prints out available
storage devices with information about:
- Model –
Model of the storage device.
- Disk –
Name and size of the disk.
- Sector size –
Logical and physical size of the memory. Not to be confused with available disk space.
- Partition Table –
Partition table type (msdos, gpt, aix, amiga, bsd, dvh, mac, pc98, sun,
and loop).
- Disk Flags –
Partitions with information on size, type, file system, and flags.
Partitions types can be:
- Primary –
Holds the operating system files. Only four primary partitions can be
created.
- Extended –
Special type of partition in which more than the four primary partitions
can be created.
- Logical –
Partition that has been created inside of an extended partition.
In our example, there are two storage
devices (/dev/sda and /dev/sdb):

Note: The
first storage disk (dev/sda or dev/vda)
contains the operating system. Creating a partition on this disk can make your
system unbootable. Only create partitions on secondary disks (dev/sdb, dev/sdc, dev/vdb,
or dev/vdc).
Step 2: Open Storage
Disk
Open the storage disk that you intend
to partition by running the following command:
sudo parted
/dev/sdb

Always specify the storage device. If
you don’t specify a disk name, the disk is randomly selected. To change the
disk to dev/sdb run:
select /dev/sdb
The dev/sdb disk
is open:

Step 3: Make a
Partition Table
Create a partition table before partitioning
the disk. A partition table is located at the start of a hard drive and it
stores data about the size and location of each partition.
Partition table types are: aix, amiga, bsd, dvh, gpt, mac, ms-dos, pc98, sun,
and loop.
The create a partition table, enter
the following:
mklabel
[partition_table_type]
For example, to create a gpt partition
table, run the following command:
mklabel gpt
Type Yes to execute:

Note: The
two most commonly used partition table types are gpt and msdos.
The latter supports up to sixteen partitions and formats up to 16TB of space
while gpt formats up to 9.4ZB and supports up to 128 partitions.
Step 4: Check Table
Run the print command
to review the partition table. The output displays information about the
storage device:

Note: Run help mkpart command
to get additional help on how to create a new partition.
Step 5: Create
Partition
Let’s make a new 1854MB-partition
using the ext4 file system. The assigned disk start shall be 1MB and the disk
end is at 1855MB.
To create a new partition, enter the
following:
mkpart primary
ext4 1MB 1855MB
After that, run the print command
to review information on the newly created partition. The information is
displayed under the Disk Flags section:

In a gpt partition table, the
partition type is the mandatory partition name. In our example, primary is
the name of the partition, not the partition type.
To save your actions and quit, enter
the quit command.
Changes are saved automatically with this command.

Note: The “You
may need to update /etc/fstab file” message signals that the partition
can be mounted automatically at boot time.
Option 2:
Partition a Disk Using fdisk Command
Follow the steps below to partition a
disk in Linux by using the fdisk command.
Step 1: List Existing
Partitions
Run the following command to list all
existing partitions:
sudo fdisk -l
The output contains information about
storage disks and partitions:

Step 2: Select Storage
Disk
Select the storage disk you want to
create partitions on by running the following command:
sudo fdisk
/dev/sdb
The /dev/sdbstorage
disk is open:

Step 3: Create a New
Partition
1. Run the n command
to create a new partition.
2. Select the partition number by
typing the default number (2).
3. After that, you are asked for the
starting and ending sector of your hard drive. It is best to type the default
number in this section (3622912).
4. The last prompt is related to the
size of the partition. You can choose to have several sectors or to set the
size in megabytes or gigabytes. Type +2GB to
set the size of the partition to 2GB.
A message appears confirming that the
partition is created.

Step 4: Write on Disk
The system created the partition, but
the changes are not written on the disk.
1. To write the changes on disk, run
the w command:

2. Verify that the partition is
created by running the following command:
sudo fdisk -l
As you can see, the partition /dev/sdb2 has
been created.

Format the
Partition
Once a partition has been created
with the parted of fdisk command,
format it before using it.
Format the partition by running the
following command:
sudo mkfs -t ext4
/dev/sdb1

Note: Check
out our guide and learn how to format
and mount disk partitions in Linux using ext4,
FAT32, or NTFS file system!
Mount the Partition
To begin interacting with the disk,
create a mount point and mount the partition to
it.
1. Create a mount point by running
the following command:
sudo mkdir -p
/mt/sdb1
2. After that, mount the partition by
entering:
sudo mount -t auto
/dev/sbd1 /mt/sdb1
The terminal does not print out an
output if the commands are executed successfully.
3. Verify if partition is mounted by
using the df hT command:

Note: If
you have NTFS partitions on your hard drive, check out our article on how
to mount NTFS partitions in Linux.
fork, exec, wait and exit
Processes and programs
A program in Unix
is a sequence of executable instructions on a disk. You can use the
command size to get a very cursory check of the structure
and memory demands of the program, or use the various invocations of objdump for a much more detailed view. The only
aspect that is of interest to us is the fact that a program is a sequence of
instructions and data (on disk) that may potentially be executed at some point
in time, maybe even multiple times, maybe even concurrently. Such a program in
execution is called a process. The process contains the code and initial data
of the program itself, and the actual state at the current point in time for
the current execution. That is the memory map and the associated memory (check
/proc/pid/maps), but also the program counter, the processor
registers, the stack, and finally the current root directory, the current
directory, environment variables and the open files, plus a few other things
(in modern Linux for example, we find the processes cgroups and namespace
relationships, and so on - things became a lot more complicated since 1979). In
Unix processes and programs are two different and independent things. You can
run a program more than once, concurrently. For example, you can run two
instances of the vi editor, which edit two
different texts. Program and initial data are the same: it is the same editor.
But the state inside the processes is different: the text, the insert mode,
cursor position and so on differ. From a programmers point of view, “the code
is the same, but the variable values are differing”. A process can run more
than one program: The currently running program is throwing itself away, but
asks that the operating system loads a different program into the same process.
The new program will inherit some reused process state, such as current
directories, file handles, privileges and so on. All of that is done in
original Unix, at the system level, with only four syscalls:
- fork()
- exec()
- wait()
- exit()
Usermode and Kernel
Context
switching: Process 1 is running for a bit, but at (1) the kernel interrupts the
execution and switches to process 2. Some time later, process 2 is frozen, and
we context switch back to where we left off with (1), and so on. For each
process, this seems to be seamless, but it happens in intervals that are not
continous. Whenever a Unix process does a system call (and at some
other opportunities) the current process leaves the user context and the
operating system code is being activated. This is privileged kernel code, and
the activation is not quite a subroutine call, because not only is privileged
mode activated, but also a kernel stack is being used and the CPU registers of
the user process are saved. From the point of view of the kernel function, the
user process that has called us is inert data and can be manipulated at will.
The kernel will then execute the system call on behalf of the user program, and
then will try to exit the kernel. The typical way to leave the kernel is
through the scheduler. The scheduler will review the process list and current
situation. It will then decide into which of all the different userland
processes to exit. It will restore the chosen processes registers, then return
into this processes context, using this processes stack. The chosen process may
or may not be the one that made the system call. In short: Whenever you make a
system call, you may (or may not) lose the CPU to another process. That’s not
too bad, because this other process at some point has to give up the CPU and
the kernel will then return into our process as if nothing happened. Our
program is not being executed linearly, but in a sequence of subjectively
linear segments, with breaks inbetween. During these breaks the CPU is working
on segments of other processes that are also runnable.
fork() and exit()
In traditional Unix the
only way to create a process is using the fork() system
call. The new process gets a copy of the current program, but new process id
(pid). The process id of the parent process (the process that called fork()) is
registered as the new processes parent pid (ppid) to build a process tree. In
the parent process, fork() returns and delivers the new processes
pid as a result. The new process also returns from the fork() system
call (because that is when the copy was made), but the result of the fork() is
0. So fork() is a special system call. You call it
once, but the function returns twice: Once in the parent, and once in the child
process. fork() increases the number of processes in the
system by one. Every Unix process always starts their existence by returning
from a fork() system call with a 0 result, running
the same program as the parent process. They can have different fates because
the result of the fork() system call is different in the parent
and child incarnation, and that can drive execution down different if() branches.
In Code:
#include <stdio.h>#include <unistd.h>#include <stdlib.h> main(void) { pid\_t pid = 0; pid = fork(); if (pid == 0) { printf("I am the child.\\n"); } if (pid > 0) { printf("I am the parent, the child is %d.\\n", pid); } if (pid < 0) { perror("In fork():"); } exit(0);}Running this, we get:
kris@linux:/tmp/kris> make probe1cc probe1.c -o probe1kris@linux:/tmp/kris> ./probe1I am the child.I am the parent, the child is 16959.We are defining a
variable pid of the type pid_t. This
variable saves the fork() result, and using it we activate one
(“I am the child.”) or the other (“I am the parent”) branch of an if(). Running
the program we get two result lines. Since we have only one variable, and this
variable can have only one state, an instance of the program can only be in
either one or the other branch of the code. Since we see two lines of output,
two instances of the program with different values for pid must
have been running. If we called getpid() and
printed the result we could prove this by showing two different pids (change
the program to do this as an exercise!). The fork() system
call is entered once, but left twice, and increments the number of processes in
the system by one. After finishing our program the number of processes in the
system is as large as before. That means there must be another system call
which decrements the number of system calls. This system call is exit(). exit() is
a system call you enter once and never leave. It decrements the number of
processes in the system by one. exit() also
accepts an exit status as a parameter, which the parent process can receive (or
even has to receive), and which communicates the fate of the child to the
parent. In our example, all variants of the program call exit() -
we are calling exit() in the child process, but also in the
parent process. That means we terminate two processes. We can only do this,
because even the parent process is a child, and in fact, a child of our shell.
The shell does exactly the same thing we are doing:
bash (16957) --- calls fork() ---> bash (16958) --- becomes ---> probe1 (16958) probe1 (16958) --- calls fork() ---> probe1 (16959) --> exit() | +---> exit()exit() closes
all files and sockets, frees all memory and then terminates the process. The
parameter of exit() is the only thing that survives and is
handed over to the parent process.
wait()
Our child process ends
with an exit(0). The 0 is the exit status of our program and
can be shipped. We need to make the parent process pick up this value and we
need a new system call for this. This system call is wait(). In
Code:
#include <stdio.h>#include <unistd.h>#include <stdlib.h> #include <sys/types.h>#include <sys/wait.h> main(void) { pid\_t pid = 0; int status; pid = fork(); if (pid == 0) { printf("I am the child.\\n"); sleep(10); printf("I am the child, 10 seconds later.\\n"); } if (pid > 0) { printf("I am the parent, the child is %d.\\n", pid); pid = wait(&status); printf("End of process %d: ", pid); if (WIFEXITED(status)) { printf("The process ended with exit(%d).\\n", WEXITSTATUS(status)); } if (WIFSIGNALED(status)) { printf("The process ended with kill -%d.\\n", WTERMSIG(status)); } } if (pid < 0) { perror("In fork():"); } exit(0);} And the runtime protocol:
kris@linux:/tmp/kris> make probe2cc probe2.c -o probe2kris@linux:/tmp/kris> ./probe2I am the child.I am the parent, the child is 17399.I am the child, 10 seconds later.End of process 17399: The process ended with exit(0).The variable status is
passed to the system call wait() as
a reference parameter, and will be overwritten by it. The value is a bitfield,
containing the exit status and additional reasons explaining how the program
ended. To decode this, C offers a number of macros with predicates such
as WIFEXITED() or WIFSIGNALED(). We also
get extractors, such as WEXITSTATUS() and WTERMSIG(). wait() also
returns the pid of the process that terminated, as a function result. wait() stops
execution of the parent process until either a signal arrives or a child
process terminates. You can arrange for a SIGALARM to be sent to you in order
to time bound the wait().
The init program, and Zombies
The program init with
the pid 1 will do basically nothing but calling wait(): It
waits for terminating processes and polls their exit status, only to throw it
away. It also reads /etc/inittab and starts the programs
configured there. When something from inittab terminates
and is set to respawn, it will be restarted by init. When a
child process terminates while the parent process is not (yet) waiting for the
exit status, exit() will still free all memory, file
handles and so on, but the struct task (basically
the ps entry) cannot be thrown away. It may be that the parent
process at some point in time arrives at a wait() and
then we have to have the exit status, which is stored in a field in the struct
task, so we need to retain it. And while the child process is dead
already, the process list entry cannot die because the exit status has not yet
been polled by the parent. Unix calls such processes without memory or other
resouces associated Zombies. Zombies are visible in the process list when a process
generator (a forking process) is faulty and does not wait() properly.
They do not take up memory or any other resouces but the bytes that make up
their struct task. The other case can happen, too: The parent
process exits while the child moves on. The kernel will set the ppid of such
children with dead parents to the constant value 1, or in other words: init inherits
orphaned processes. When the child terminates, init will wait() for
the exit status of the child, because that’s what init does.
No Zombies in this case. When we observe the number of processes in the system
to be largely constant over time, then the number of calls to fork(), exit() and wait() have
to balanced. This is, because for each fork() there
will be an exit() to match and for each exit() there
must be a wait() somewhere. In reality, and in modern
systems, the situation is a bit more complicated, but the original idea is as
simple as this. We have a clean fork-exit-wait triangle that describes all
processes.
exec()
So while fork() makes
processes, exec() loads programs into processes that
already exist. In Code:
#include <stdio.h>#include <unistd.h>#include <stdlib.h> #include <sys/types.h>#include <sys/wait.h> main(void) { pid\_t pid = 0; int status; pid = fork(); if (pid == 0) { printf("I am the child.\\n"); execl("/bin/ls", "ls", "-l", "/tmp/kris", (char \*) 0); perror("In exec(): "); } if (pid > 0) { printf("I am the parent, and the child is %d.\\n", pid); pid = wait(&status); printf("End of process %d: ", pid); if (WIFEXITED(status)) { printf("The process ended with exit(%d).\\n", WEXITSTATUS(status)); } if (WIFSIGNALED(status)) { printf("The process ended with kill -%d.\\n", WTERMSIG(status)); } } if (pid < 0) { perror("In fork():"); } exit(0);}The runtime protocol:
kris@linux:/tmp/kris> make probe3cc probe3.c -o probe3 kris@linux:/tmp/kris> ./probe3I am the child.I am the parent, the child is 17690.total 36-rwxr-xr-x 1 kris users 6984 2007-01-05 13:29 probe1-rw-r--r-- 1 kris users 303 2007-01-05 13:36 probe1.c-rwxr-xr-x 1 kris users 7489 2007-01-05 13:37 probe2-rw-r--r-- 1 kris users 719 2007-01-05 13:40 probe2.c-rwxr-xr-x 1 kris users 7513 2007-01-05 13:42 probe3-rw-r--r-- 1 kris users 728 2007-01-05 13:42 probe3.cEnd of process 17690: The process ended with exit(0).Here the code of probe3 is
thrown away in the child process (the perror("In exec():") is
not reached). Instead the running program is being replaced by the given call
to ls. From the protocol we can see the parent instance of probe3 waits
for the exit(). Since the perror() after
the execl()is never executed, it cannot be an exit() in
our code. In fact, ls ends the process we made with an exit() and
that is what we receive our exit status from in our parent processes wait() call.
The same, as a Shellscript
The examples above have
been written in C. We can do the same, in bash:
kris@linux:/tmp/kris> cat probe1.sh#! /bin/bash -- echo"Starting child:"
sleep10&
echo"The child is $!"
echo"The parent is $$"
echo"$(date): Parent waits."
waitecho"The child $! has the exit status $?"
echo"$(date): Parent woke up."
kris@linux:/tmp/kris> ./probe1.shStarting child:The child is18071
The parent is18070
Fri Jan513:49:56 CET 2007: Parent waits.
The child18071has theexitstatus0
Fri Jan513:50:06 CET 2007: Parent woke up.
The actual bash
We can also trace the
shell while it executes a single command. The information from above should
allow us to understand what goes on, and see how the shell actually works.
kris@linux:~> strace -f -e execve,clone,fork,waitpid bashkris@linux:~> lsclone(Process 30048 attachedchild\_stack=0, flags=CLONE\_CHILD\_CLEARTID|CLONE\_CHILD\_SETTID|SIGCHLD,child\_tidptr=0xb7dab6f8) = 30048\[pid 30025\] waitpid(-1, Process 30025 suspended <unfinished ...>\[pid 30048\] execve("/bin/ls", \["/bin/ls", "-N", "--color=tty", "-T", "0"\],\[/\* 107 vars \*/\]) = 0...Process 30025 resumedProcess 30048 detached<... waitpid resumed> \[{WIFEXITED(s) && WEXITSTATUS(s) == 0}\], WSTOPPEDWCONTINUED) = 30048--- SIGCHLD (Child exited) @ 0 (0) ---...
Unit -2
User Management In Linux/Unix Systems – A
Quick Guide
Linux is a multi-user
operating system i.e., it allows multiple users on different computers or
terminals to access a single system. This makes it mandatory to know how
to perform effective user management; how to add, modify, suspend, or delete
user accounts, along with granting them the necessary permissions to do their
assigned tasks. For this multi-user design to work properly there needs to
be a method to enforce concurrency control. This is where permissions come in
to play.
Normally Linux/Unix
based systems have two user accounts; a general user account, and the
root account, which is the super user that can access everything on the
machine, make system changes, and administer other users. Some variants of
Linux work a little differently though. Like in Ubuntu, we can’t login
directly as root by default, and need to use sudo command to switch to root-level
access when making changes.
User Permissions
Permissions or
access rights are methods that direct users on how to act on a file or
directory. There are three basic access rights viz., read, write, and
execute.
- Read – read
permission allows the contents of a file to be viewed. Read permission on
a directory allows you to list the contents of a directory.
- Write – write permission on
a file allows you to modify contents of that file. Write permission allows
you to edit the contents of a directory or file.
- Execute – for a file, execute
permission allows you to run the file as an executable program or
script. For a directory, the execute permission allows you to change to a
different directory and make it your current working directory.
The command ls -l <directory/file> is used to view the permissions on a
file or directory, remember to replace the information in the < > with
the actual file or directory name. Below is sample output for the ls command:
|
-rw-r--r--
1 root wheel 5581 Sep 10 2014 /etc/passwd |
The access
permissions are denoted by the first ten characters. Starting with “_”,
indicating the type of resource viz., ‘d’ for directory, ‘s’ for any
special file, and “_” for a regular file. Following three characters “r
w -” define the owner’s permissions to the file. Here, file owner
has ‘read’ and ‘write’ permissions only. The next three characters “r – –”
are the permissions for members of the same group as the file owner, which in
this instance is ‘read’ only. The last three characters show
permissions for all other users and in this instance it is ‘read’ only.
Creating and Deleting User Accounts
In order
to create a new standard user, we use useradd command. The syntax is as follows:
|
useradd
<user-name> |
The useradd command is
the most portable command to create users across various Linux
distributions. It provides with it a range of variables,
some of which are explained in the table below:
|
Variable |
Description |
Usage |
|
-d <home_dir> |
<home_dir>
will be the user’s home directory on login to the system. |
useradd <name> -d /home/<user's home> |
|
-e <date> |
optional expiry
date for the user account |
user add <name>** -e <YYYY-MM-DD> |
|
-f <inactive> |
Inactive period,
in days, before actual expiration of user account |
useradd <name> -f <0 or -1> |
|
-s <shell> |
Default shell
type for the user account |
useradd <name> -s /bin/<shell> |
Once a user is
created, passwd command is
used to set a password for the new user. Root privileges are needed to change a
user password. The syntax is as follows:
|
passwd
<user-name> |
The user will be
able to change password anytime using passwd command once the user is logged in. Below is an example:
|
$ > > > > > |
passwd Changing
password for testuser. old
password: Enter
new password: Retype
new password: passwd:
password updated successfully |
This is useful when
you want to create a user who just needs to login and use the system in it’s
current state without having to store any personal files, etc. For example, an
administrator needs access to do his/her duties while a regular user might want
their own home directory to store their files etc.
We have another
convenient way of creating user accounts which might come in handy for
first-time system administrators. There is an adduser utility
which, however, needs to be installed as a new package. The installation
command for Debian/Ubuntu system is as under:
|
apt-get
install adduser |
The adduser utility
automatically creates a home directory and sets default group, shell, etc. To
create a new standard user use adduser command; the syntax
is as follows:
|
adduser
<user-name> |
Running this
command will result in a series of optional information prompts. We should
include user-name and a password along with the command.
Once the user
account is created, full account information is stored in /etc/passwd file.
This file contains a record per system user account and has the following
format.
|
[username]:[x]:[UID]:[GID]:[comment]:[home_dir]:[default-shell] |
- [username] is the created user
and [comment] part is the optional description.
- x in field indicates
that the account is protected by a shadowed password stored in /etc/shadow,
which is required for the user login.
- [UID] and [GID] fields
are integers representing User ID and the primary Group
ID to which user belongs.
- [home_dir] indicates the absolute
path to user’s home directory.
- [default-shell] is the shell that is
allocated to this user when it logs into the system.
Group information
is stored in /etc/group file. Each record has the following
format:
|
[group]:[group-password]:[GID]:[group-members] |
- [group] is the name of the
user group.
- An x in [group-password] indicates
group passwords are not being used.
- [GID]: is the Group ID same as
in /etc/passwd.
- [group-members]: a comma separates list of users
that belong to [group].
Removing a user
account can be simply done by using userdel command. The
syntax is explained below:
|
1 |
userdel
<user-name> |
Using the
command above will only delete user’s account. User’s home directory and
other files will not be deleted.
In order to
completely remove the user, his home directory, and other files belonging
to user, use userdel command with additional parameters as
shown below:
|
userdel
-r <user-name> |
It is important to
follow security policies and therefore, it is strongly recommended to use
unique passwords for each account, without any compromises.
Modifying User Accounts
Once a
user account is created, we can edit information associated with the
user using usermod command, whose basic syntax is as follows:
|
usermod
[options] [user-name] |
Setting the Expiry Date for an Account
Use —expiredate flag
followed by a date in YYYY-MM-DD format.
|
usermod
--expiredate 2015-08-30 testuser |
Adding User to Supplementary Groups
Use the
combined -aG or —append —groups option,
followed by a comma separating list of groups.
|
usermod
--append --groups root,test-users testuser |
Changing Default Location of User’s Home Directory
Use -d or
—home option, followed by the absolute path to the new home directory.
|
usermod
--home /tmp testuser |
Changing the Shell the User will use by Default
Use -s
or –shell option, followed by the path to the new shell.
|
usermod
--shell /bin/sh testuser |
These operations
can be carried out together using the command below:
|
usermod
--expiredate 2015-08-30 --append --groups root,users --home /tmp --shell
/bin/sh testuser |
Disabling Account by Locking Password
Use -L or –lock option
to lock a user’s password or disable a user account.
|
usermod
--lock testuser |
Unlocking User Password
Use –u or –unlock option
to unlock a user’s password that was previously locked or a user that was
disabled.
|
usermod
--unlock testuser |
Creating a New Group with Proper Permissions
To create a new
group we can simply use <b>groupadd</b> command.
|
$
groupadd test_group |
The
following command will change group owner of test_file.txt to test_group.
|
$
chown :test_group test_file.txt |
In order to add a
test-user to test_group we run the following command:
|
$
usermod -aG test_group test-user |
Deleting a Group
We can delete
a group using the following command,
|
$
groupdel [group] |
If there are files
owned by a group, they will not be deleted, but the group owner
will be set to the GID of the group that was deleted.
Unix / Linux - File System Basics
The directories have
specific purposes and generally hold the same types of information for easily
locating files. Following are the directories that exist on the major versions
of Unix −
|
Sr.No. |
Directory & Description |
|
1 |
/ This is the root
directory which should contain only the directories needed at the top level
of the file structure |
|
2 |
/bin This is where the
executable files are located. These files are available to all users |
|
3 |
/dev These are device
drivers |
|
4 |
/etc Supervisor
directory commands, configuration files, disk configuration files, valid user
lists, groups, ethernet, hosts, where to send critical messages |
|
5 |
/lib Contains shared
library files and sometimes other kernel-related files |
|
6 |
/boot Contains files for
booting the system |
|
7 |
/home Contains the home
directory for users and other accounts |
|
8 |
/mnt Used to mount other
temporary file systems, such as cdrom and floppy for
the CD-ROM drive and floppy diskette drive,
respectively |
|
9 |
/proc Contains all
processes marked as a file by process number or other
information that is dynamic to the system |
|
10 |
/tmp Holds temporary
files used between system boots |
|
11 |
/usr Used for miscellaneous
purposes, and can be used by many users. Includes administrative commands,
shared files, library files, and others |
|
12 |
/var Typically contains
variable-length files such as log and print files and any other type of file
that may contain a variable amount of data |
|
13 |
/sbin Contains binary
(executable) files, usually for system administration. For example, fdisk and ifconfig utlities |
|
14 |
/kernel Contains kernel
files |
Navigating the File System
Now that you
understand the basics of the file system, you can begin navigating to the files
you need. The following commands are used to navigate the system −
|
Sr.No. |
Command & Description |
|
1 |
cat filename Displays a filename |
|
2 |
cd dirname Moves you to the
identified directory |
|
3 |
cp file1 file2 Copies one
file/directory to the specified location |
|
4 |
file filename Identifies the file
type (binary, text, etc) |
|
5 |
find filename dir Finds a
file/directory |
|
6 |
head filename Shows the beginning
of a file |
|
7 |
less filename Browses through a
file from the end or the beginning |
|
8 |
ls dirname Shows the contents
of the directory specified |
|
9 |
mkdir dirname Creates the
specified directory |
|
10 |
more filename Browses through a
file from the beginning to the end |
|
11 |
mv file1 file2 Moves the location
of, or renames a file/directory |
|
12 |
pwd Shows the current
directory the user is in |
|
13 |
rm filename Removes a file |
|
14 |
rmdir dirname Removes a directory |
|
15 |
tail filename Shows the end of a
file |
|
16 |
touch filename Creates a blank
file or modifies an existing file or its attributes |
|
17 |
whereis filename Shows the location
of a file |
|
18 |
which filename Shows the location
of a file if it is in your PATH |
You can use Manpage Help to check complete syntax for
each command mentioned here.
The df Command
The first way to
manage your partition space is with the df (disk free) command.
The command df -k (disk free) displays the disk space
usage in kilobytes, as shown below −
$df -k
Filesystem
1K-blocks Used Available Use% Mounted on
/dev/vzfs
10485760 7836644 2649116
75% /
/devices 0 0
0 0% /devices
$
Some of the
directories, such as /devices, shows 0 in the kbytes, used, and
avail columns as well as 0% for capacity. These are special (or virtual) file
systems, and although they reside on the disk under /, by themselves they do
not consume disk space.
The df -k output
is generally the same on all Unix systems. Here's what it usually includes −
|
Sr.No. |
Column & Description |
|
1 |
Filesystem The physical file
system name |
|
2 |
kbytes Total kilobytes of
space available on the storage medium |
|
3 |
used Total kilobytes of
space used (by files) |
|
4 |
avail Total kilobytes
available for use |
|
5 |
capacity Percentage of total
space used by files |
|
6 |
Mounted on What the file
system is mounted on |
You can use the -h
(human readable) option to display the output in a format that shows
the size in easier-to-understand notation.
The du Command
The du (disk
usage) command enables you to specify directories to show disk space
usage on a particular directory.
This command is
helpful if you want to determine how much space a particular directory is
taking. The following command displays number of blocks consumed by each
directory. A single block may take either 512 Bytes or 1 Kilo Byte depending on
your system.
$du /etc
10
/etc/cron.d
126 /etc/default
6
/etc/dfs
...
$
The -h option
makes the output easier to comprehend −
$du -h /etc
5k /etc/cron.d
63k /etc/default
3k /etc/dfs
...
$
Mounting the File System
A file system must be
mounted in order to be usable by the system. To see what is currently mounted
(available for use) on your system, use the following command −
$ mount
/dev/vzfs on / type reiserfs (rw,usrquota,grpquota)
proc on /proc type proc (rw,nodiratime)
devpts on /dev/pts type devpts (rw)
$
The /mnt directory,
by the Unix convention, is where temporary mounts (such as CDROM drives, remote
network drives, and floppy drives) are located. If you need to mount a file
system, you can use the mount command with the following syntax −
mount -t file_system_type device_to_mount
directory_to_mount_to
For example, if you
want to mount a CD-ROM to the directory /mnt/cdrom,
you can type −
$ mount -t iso9660 /dev/cdrom /mnt/cdrom
This assumes that
your CD-ROM device is called /dev/cdrom and that you want to
mount it to /mnt/cdrom. Refer to the mount man page for more
specific information or type mount -h at the command line for
help information.
After mounting, you
can use the cd command to navigate the newly available file system through the
mount point you just made.
Unmounting the File System
To unmount (remove)
the file system from your system, use the umount command by
identifying the mount point or device.
For example, to
unmount cdrom, use the following command −
$ umount /dev/cdrom
The mount
command enables you to access your file systems, but on most modern
Unix systems, the automount function makes this process
invisible to the user and requires no intervention.
User and Group Quotas
The user and group
quotas provide the mechanisms by which the amount of space used by a single
user or all users within a specific group can be limited to a value defined by
the administrator.
Quotas operate around
two limits that allow the user to take some action if the amount of space or
number of disk blocks start to exceed the administrator defined limits −
· Soft Limit − If the user
exceeds the limit defined, there is a grace period that allows the user to free
up some space.
· Hard Limit − When the hard
limit is reached, regardless of the grace period, no further files or blocks
can be allocated.
There are a number of
commands to administer quotas −
|
Sr.No. |
Command & Description |
|
1 |
quota Displays disk usage
and limits for a user of group |
|
2 |
edquota This is a quota
editor. Users or Groups quota can be edited using this command |
|
3 |
quotacheck Scans a filesystem
for disk usage, creates, checks and repairs quota files |
|
4 |
setquota This is a command
line quota editor |
|
5 |
quotaon This announces to
the system that disk quotas should be enabled on one or more filesystems |
|
6 |
quotaoff This announces to
the system that disk quotas should be disabled for one or more filesystems |
|
7 |
repquota This prints a
summary of the disc usage and quotas for the specified file systems |
cat(1) - Linux man page
Name
cat - concatenate files and print
on the standard output
Synopsis
cat [OPTION]... [FILE]...
Description
Concatenate FILE(s),
or standard input, to standard output.
-A, --show-all
equivalent
to -vET
-b, --number-nonblank
number
nonempty output lines
-e
equivalent
to -vE
-E, --show-ends
display
$ at end of each line
-n, --number
number
all output lines
-s, --squeeze-blank
suppress
repeated empty output lines
-t
equivalent
to -vT
-T, --show-tabs
display
TAB characters as ^I
-u
(ignored)
-v, --show-nonprinting
use
^ and M- notation, except for LFD and TAB
--help
display
this help and exit
--version
output
version information and exit
With no FILE, or
when FILE is -, read standard input.
Examples
cat f - g
Output
f's contents, then standard input, then g's contents.
cat
Copy
standard input to standard output.
cp(1) - Linux man page
Name
cp - copy files and directories
Synopsis
cp [OPTION]... [-T] SOURCE
DEST
cp [OPTION]... SOURCE... DIRECTORY
cp [OPTION]... -t
DIRECTORY SOURCE...
Description
Copy SOURCE to
DEST, or multiple SOURCE(s) to DIRECTORY.
Mandatory arguments
to long options are mandatory for short options too.
-a, --archive
same
as -dR --preserve=all
--backup[=CONTROL]
make
a backup of each existing destination file
-b
like --backup but
does not accept an argument
--copy-contents
copy
contents of special files when recursive
-d
same
as --no-dereference --preserve=links
-f, --force
if
an existing destination file cannot be opened, remove it and try again (redundant
if the -n option is used)
-i, --interactive
prompt
before overwrite (overrides a previous -n option)
-H
follow
command-line symbolic links in SOURCE
-l, --link
link
files instead of copying
-L, --dereference
always
follow symbolic links in SOURCE
-n, --no-clobber
do
not overwrite an existing file (overrides a previous -i option)
-P, --no-dereference
never
follow symbolic links in SOURCE
-p
same
as --preserve=mode,ownership,timestamps
--preserve[=ATTR_LIST]
preserve
the specified attributes (default: mode,ownership,timestamps), if possible
additional attributes: context, links, xattr, all
-c
same
as --preserve=context
--no-preserve=ATTR_LIST
don't
preserve the specified attributes
--parents
use
full source file name under DIRECTORY
-R, -r, --recursive
copy
directories recursively
--reflink[=WHEN]
control
clone/CoW copies. See below.
--remove-destination
remove
each existing destination file before attempting to open it (contrast
with --force)
--sparse=WHEN
control
creation of sparse files. See below.
--strip-trailing-slashes
remove
any trailing slashes from each SOURCE argument
-s, --symbolic-link
make
symbolic links instead of copying
-S, --suffix=SUFFIX
override
the usual backup suffix
-t, --target-directory=DIRECTORY
copy
all SOURCE arguments into DIRECTORY
-T, --no-target-directory
treat
DEST as a normal file
-u, --update
copy
only when the SOURCE file is newer than the destination file or when the
destination file is missing
-v, --verbose
explain
what is being done
-x, --one-file-system
stay
on this file system
-Z, --context=CONTEXT
set
security context of copy to CONTEXT
--help
display
this help and exit
--version
output
version information and exit
chmod(1) - Linux man page
Name
chmod - change file mode bits
Synopsis
chmod [OPTION]... MODE[,MODE]... FILE...
chmod [OPTION]... OCTAL-MODE
FILE...
chmod [OPTION]... --reference=RFILE
FILE...
Options
Change the mode of
each FILE to MODE.
-c, --changes
like
verbose but report only when a change is made
--no-preserve-root
do
not treat '/' specially (the default)
--preserve-root
fail
to operate recursively on '/'
-f, --silent, --quiet
suppress
most error messages
-v, --verbose
output
a diagnostic for every file processed
--reference=RFILE
use
RFILE's mode instead of MODE values
-R, --recursive
change
files and directories recursively
--help
display
this help and exit
--version
output
version information and exit
Each MODE is of the
form '[ugoa]*([-+=]([rwxXst]*|[ugo]))+'.
mkdir(1) - Linux man page
Name
mkdir - make directories
Synopsis
mkdir [OPTION]... DIRECTORY...
Description
Create the
DIRECTORY(ies), if they do not already exist.
Mandatory arguments
to long options are mandatory for short options too.
-m, --mode=MODE
set
file mode (as in chmod), not a=rwx - umask
-p, --parents
no
error if existing, make parent directories as needed
-v, --verbose
print
a message for each created directory
-Z, --context=CTX
set
the SELinux security context of each created directory to CTX
--help
display
this help and exit
--version
output
version information and exit
Name
more - file perusal filter for crt viewing
Synopsis
more [-dlfpcsu] [-num] [+/pattern]
[+linenum] [file ...]
Description
More is a filter for paging through text one
screenful at a time. This version is especially primitive. Users should realize
that less(1) provides more(1) emulation and
extensive enhancements.
Options
Command line
options are described below. Options are also taken from the environment
variable MORE (make sure to precede them with a dash (''-'')) but command line
options will override them.
-num
This option specifies an integer which is the
screen size (in lines).
-d' more will prompt the user with
the message "[Press space to continue, 'q' to quit.]" and will
display "[Press 'h' for instructions.]" instead of ringing the bell
when an illegal key is pressed.
-l' more usually treats ^L (form
feed) as a special character, and will pause after any line that contains a
form feed. The -l option will prevent this behavior.
-f' Causes more to count logical,
rather than screen lines (i.e., long lines are not folded).
-p' Do not scroll. Instead, clear the whole screen
and then display the text.
-c' Do not scroll. Instead, paint each screen from
the top, clearing the remainder of each line as it is displayed.
-s' Squeeze multiple blank lines into one.
-u' Suppress underlining.
+/' The +/ option specifies a string
that will be searched for before each file is displayed.
+num
Start at line number num.
Name
mv - move (rename) files
Synopsis
mv [OPTION]... [-T] SOURCE
DEST
mv [OPTION]... SOURCE... DIRECTORY
mv [OPTION]... -t
DIRECTORY SOURCE...
Description
Rename SOURCE to
DEST, or move SOURCE(s) to DIRECTORY.
Mandatory arguments
to long options are mandatory for short options too.
--backup[=CONTROL]
make
a backup of each existing destination file
-b
like --backup but
does not accept an argument
-f, --force
do
not prompt before overwriting
-i, --interactive
prompt
before overwrite
-n, --no-clobber
do
not overwrite an existing file
If you specify more
than one of -i, -f, -n, only the final one
takes effect.
--strip-trailing-slashes
remove
any trailing slashes from each SOURCE argument
-S, --suffix=SUFFIX
override
the usual backup suffix
-t, --target-directory=DIRECTORY
move
all SOURCE arguments into DIRECTORY
-T, --no-target-directory
treat
DEST as a normal file
-u, --update
move
only when the SOURCE file is newer than the destination file or when the
destination file is missing
-v, --verbose
explain
what is being done
--help
display
this help and exit
--version
output
version information and exit
The backup suffix
is '~', unless set with --suffix or SIMPLE_BACKUP_SUFFIX. The
version control method may be selected via the --backup option
or through the VERSION_CONTROL environment variable. Here are the values:
none, off
never
make backups (even if --backup is given)
numbered, t
make
numbered backups
existing, nil
numbered
if numbered backups exist, simple otherwise
simple, never
always
make simple backups
rm(1) - Linux man page
Name
rm - remove files or directories
Synopsis
rm [OPTION]... FILE...
Description
This manual page documents the GNU
version of rm. rm removes each specified file. By
default, it does not remove directories.
If the -I or --interactive=once option
is given, and there are more than three files or the -r, -R,
or --recursive are given, then rm prompts the
user for whether to proceed with the entire operation. If the response is not
affirmative, the entire command is aborted.
Otherwise, if a
file is unwritable, standard input is a terminal, and the -f or --force option
is not given, or the -i or --interactive=always option
is given, rm prompts the user for whether to remove the file.
If the response is not affirmative, the file is skipped.
Options
Remove (unlink)
the FILE(s).
-f, --force
ignore
nonexistent files, never prompt
-i
prompt
before every removal
-I
prompt
once before removing more than three files, or when removing recursively. Less
intrusive than -i, while still giving protection against most
mistakes
--interactive[=WHEN]
prompt
according to WHEN: never, once (-I), or always (-i). Without
WHEN, prompt always
--one-file-system
when
removing a hierarchy recursively, skip any directory that is on a file system
different from that of the corresponding command line argument
--no-preserve-root
do
not treat '/' specially
--preserve-root
do
not remove '/' (default)
-r, -R, --recursive
remove
directories and their contents recursively
-v, --verbose
explain
what is being done
--help
display
this help and exit
--version
output
version information and exit
Unix / Linux - File Permission / Access Modes
In this chapter, we
will discuss in detail about file permission and access modes in Unix. File
ownership is an important component of Unix that provides a secure method for
storing files. Every file in Unix has the following attributes −
· Owner permissions − The owner's
permissions determine what actions the owner of the file can perform on the
file.
· Group permissions − The group's
permissions determine what actions a user, who is a member of the group that a
file belongs to, can perform on the file.
· Other (world)
permissions − The permissions for others indicate what action all other users
can perform on the file.
The Permission Indicators
While using ls
-l command, it displays various information related to file permission
as follows −
$ls -l /home/amrood
-rwxr-xr-- 1
amrood users 1024 Nov 2 00:10
myfile
drwxr-xr--- 1 amrood users 1024
Nov 2 00:10 mydir
Here, the first
column represents different access modes, i.e., the permission associated with
a file or a directory.
The permissions are
broken into groups of threes, and each position in the group denotes a specific
permission, in this order: read (r), write (w), execute (x) −
· The first three
characters (2-4) represent the permissions for the file's owner. For
example, -rwxr-xr-- represents that the owner has read (r),
write (w) and execute (x) permission.
· The second group of
three characters (5-7) consists of the permissions for the group to which the
file belongs. For example, -rwxr-xr-- represents that the
group has read (r) and execute (x) permission, but no write permission.
· The last group of
three characters (8-10) represents the permissions for everyone else. For
example, -rwxr-xr-- represents that there is read (r) only
permission.
File Access Modes
The permissions of a
file are the first line of defense in the security of a Unix system. The basic
building blocks of Unix permissions are the read, write,
and execute permissions, which have been described below −
Read
Grants the capability
to read, i.e., view the contents of the file.
Write
Grants the capability
to modify, or remove the content of the file.
Execute
User with execute
permissions can run a file as a program.
Directory Access Modes
Directory access modes
are listed and organized in the same manner as any other file. There are a few
differences that need to be mentioned −
Read
Access to a directory
means that the user can read the contents. The user can look at the filenames inside
the directory.
Write
Access means that the
user can add or delete files from the directory.
Execute
Executing a directory
doesn't really make sense, so think of this as a traverse permission.
A user must
have execute access to the bin directory in
order to execute the ls or the cd command.
Changing Permissions
To change the file or
the directory permissions, you use the chmod (change mode)
command. There are two ways to use chmod — the symbolic mode and the absolute
mode.
Using chmod in Symbolic Mode
The easiest way for a
beginner to modify file or directory permissions is to use the symbolic mode.
With symbolic permissions you can add, delete, or specify the permission set
you want by using the operators in the following table.
|
Sr.No. |
Chmod operator & Description |
|
1 |
+ Adds the designated
permission(s) to a file or directory. |
|
2 |
- Removes the
designated permission(s) from a file or directory. |
|
3 |
= Sets the designated
permission(s). |
Here's an example
using testfile. Running ls -1 on the testfile
shows that the file's permissions are as follows −
$ls -l testfile
-rwxrwxr-- 1
amrood users 1024 Nov 2 00:10
testfile
Then each
example chmod command from the preceding table is run on the
testfile, followed by ls –l, so you can see the permission changes
−
$chmod o+wx testfile
$ls -l testfile
-rwxrwxrwx 1
amrood users 1024 Nov 2 00:10
testfile
$chmod u-x testfile
$ls -l testfile
-rw-rwxrwx 1
amrood users 1024 Nov 2 00:10
testfile
$chmod g = rx testfile
$ls -l testfile
-rw-r-xrwx 1
amrood users 1024 Nov 2 00:10
testfile
Here's how you can
combine these commands on a single line −
$chmod o+wx,u-x,g = rx testfile
$ls -l testfile
-rw-r-xrwx 1
amrood users 1024 Nov 2 00:10
testfile
Using chmod with Absolute Permissions
The second way to
modify permissions with the chmod command is to use a number to specify each
set of permissions for the file.
Each permission is
assigned a value, as the following table shows, and the total of each set of
permissions provides a number for that set.
|
Number |
Octal Permission Representation |
Ref |
|
0 |
No permission |
--- |
|
1 |
Execute permission |
--x |
|
2 |
Write permission |
-w- |
|
3 |
Execute and write permission: 1
(execute) + 2 (write) = 3 |
-wx |
|
4 |
Read permission |
r-- |
|
5 |
Read and execute permission: 4
(read) + 1 (execute) = 5 |
r-x |
|
6 |
Read and write permission: 4
(read) + 2 (write) = 6 |
rw- |
|
7 |
All permissions: 4 (read) + 2
(write) + 1 (execute) = 7 |
rwx |
Here's an example
using the testfile. Running ls -1 on the testfile shows that
the file's permissions are as follows −
$ls -l testfile
-rwxrwxr-- 1
amrood users 1024 Nov 2 00:10
testfile
Then each
example chmod command from the preceding table is run on the
testfile, followed by ls –l, so you can see the permission changes
−
$ chmod 755 testfile
$ls -l testfile
-rwxr-xr-x 1
amrood users 1024 Nov 2 00:10
testfile
$chmod 743 testfile
$ls -l testfile
-rwxr---wx 1
amrood users 1024 Nov 2 00:10
testfile
$chmod 043 testfile
$ls -l testfile
----r---wx 1
amrood users 1024 Nov 2 00:10
testfile
Changing Owners and Groups
While creating an
account on Unix, it assigns a owner ID and a group ID to
each user. All the permissions mentioned above are also assigned based on the
Owner and the Groups.
Two commands are
available to change the owner and the group of files −
· chown − The chown command
stands for "change owner" and is used to change the
owner of a file.
· chgrp − The chgrp command
stands for "change group" and is used to change the
group of a file.
Changing Ownership
The chown command
changes the ownership of a file. The basic syntax is as follows −
$ chown user filelist
The value of the user
can be either the name of a user on the system or the user
id (uid) of a user on the system.
The following example
will help you understand the concept −
$ chown amrood testfile
$
Changes the owner of
the given file to the user amrood.
NOTE − The super
user, root, has the unrestricted capability to change the ownership of any file
but normal users can change the ownership of only those files that they own.
Changing Group Ownership
The chgrp command
changes the group ownership of a file. The basic syntax is as follows −
$ chgrp group filelist
The value of group
can be the name of a group on the system or the group
ID (GID) of a group on the system.
Following example
helps you understand the concept −
$ chgrp special testfile
$
Changes the group of
the given file to special group.
SUID and SGID File Permission
Often when a command
is executed, it will have to be executed with special privileges in order to
accomplish its task.
As an example, when
you change your password with the passwd command, your new
password is stored in the file /etc/shadow.
As a regular user,
you do not have read or write access to this
file for security reasons, but when you change your password, you need to have
the write permission to this file. This means that the passwd program
has to give you additional permissions so that you can write to the file /etc/shadow.
Additional
permissions are given to programs via a mechanism known as the Set User
ID (SUID) and Set Group ID (SGID) bits.
When you execute a
program that has the SUID bit enabled, you inherit the permissions of that
program's owner. Programs that do not have the SUID bit set are run with the
permissions of the user who started the program.
This is the case with
SGID as well. Normally, programs execute with your group permissions, but
instead your group will be changed just for this program to the group owner of
the program.
The SUID and SGID
bits will appear as the letter "s" if the permission
is available. The SUID "s" bit will be located in
the permission bits where the owners’ execute permission
normally resides.
For example, the
command −
$ ls -l /usr/bin/passwd
-r-sr-xr-x
1 root bin
19031 Feb 7 13:47
/usr/bin/passwd*
$
Shows that the SUID
bit is set and that the command is owned by the root. A capital letter S in
the execute position instead of a lowercase s indicates that
the execute bit is not set.
If the sticky bit is
enabled on the directory, files can only be removed if you are one of the
following users −
- The owner of the sticky
directory
- The owner of the file being
removed
- The super user, root
To set the SUID and
SGID bits for any directory try the following command −
$ chmod ug+s dirname
$ ls -l
drwsr-sr-x 2 root root 4096 Jun 19 06:45 dirname
$
Log into and out of your Unix account
Log
into Unix
Before beginning, make sure your Caps Lock key is off.
On most keyboards it is above your left Shift key. To log
into your Unix account:
- At the Login: prompt, enter your username.
- At the Password: prompt, enter your password. For
security reasons, your password does not appear on the screen when you
type it. If you enter an incorrect password, you'll be asked to enter your
username and password again. (Be aware that the Backspace or Del keys might not work
properly while you are entering your password.)
- On many systems, a page of
information and announcements, called a banner or "message of the
day" (MOD), will be displayed on your screen. It notifies you of
system changes, scheduled maintenance, and other news.
- The following line may
appear after the banner:
TERM = (vt100)
Normally, you can press Enter to set the correct terminal type. If you know that the
suggested terminal type is incorrect, enter the terminal type that your
communications program is using. If you are unsure of the correct type,
enter vt100.
- After a pause, the
Unix shell prompt will appear.
- You can now enter commands
at the Unix prompt.
Log
out of Unix
- At the Unix prompt, enter:
exit
If Unix responds with the message "There are stopped jobs",
enter:
fg
This brings a stopped job into the foreground so that you can end it
gracefully (for example, save your file from an editing session). Exit the job
in the appropriate way for that particular program, and at the Unix prompt,
again enter exit or logout.
6.2. MANAGING DISK
QUOTAS
If quotas are
implemented, they need some maintenance — mostly in the form of watching to see
if the quotas are exceeded and making sure the quotas are accurate.
Of course, if users
repeatedly exceed their quotas or consistently reach their soft limits, a
system administrator has a few choices to make depending on what type of users
they are and how much disk space impacts their work. The administrator can
either help the user determine how to use less disk space or increase the
user's disk quota.
16.2.1. Enabling and Disabling
It is possible to
disable quotas without setting them to 0. To turn all user and group quotas
off, use the following command:
# quotaoff -vaug
If neither
the -u or -g options are
specified, only the user quotas are disabled. If only -g is specified, only group quotas are disabled.
The -v switch causes verbose status information to
display as the command executes.
To enable quotas
again, use the quotaon command with the same options.
For example, to
enable user and group quotas for all file systems, use the following command:
# quotaon -vaug
To enable quotas
for a specific file system, such as /home, use the following
command:
# quotaon -vug /home
If neither
the -u or -g options are
specified, only the user quotas are enabled. If only -g is specified, only group quotas are enabled.
Hard links
The concept of a hard link is the most basic we will discuss today.
Every file on the Linux filesystem starts with a single hard link. The link is
between the filename and the actual data stored on the filesystem. Creating an
additional hard link to a file means a few different things. Let's discuss
these.
First, you create a new filename pointing to the exact same data as the
old filename. This means that the two filenames, though different, point to
identical data. For example, if I create file /home/tcarrigan/demo/link_test and
write hello world in the file, I have a single hard link between
the file name link_test and the file
content hello world.
[tcarrigan@server
demo]$ ls -l
total 4
-rw-rw-r--. 1
tcarrigan tcarrigan 12 Aug 29 14:27 link_test
Take note of the link count here (1).
Next, I create a new hard link in /tmp to the exact
same file using the following command:
[tcarrigan@server
demo]$ ln link_test /tmp/link_new
The syntax is ln (original file path) (new file
path).
Now when I look at my filesystem, I see both hard links.
[tcarrigan@server
demo]$ ls -l link_test /tmp/link_new
-rw-rw-r--. 2
tcarrigan tcarrigan 12 Aug 29 14:27 link_test
-rw-rw-r--. 2
tcarrigan tcarrigan 12 Aug 29 14:27 /tmp/link_new
The primary difference here is the filename. The link count has also
been changed (2). Most notably, if I cat the new
file's contents, it displays the original data.
[tcarrigan@server
demo]$ cat /tmp/link_new
hello world
When changes are made to one filename, the other reflects those changes.
The permissions, link count, ownership, timestamps, and file content are the
exact same. If the original file is deleted, the data still exists under the
secondary hard link. The data is only removed from your drive when all links to
the data have been removed. If you find two files with identical properties but
are unsure if they are hard-linked, use the ls
-i command to view the inode number. Files that are
hard-linked together share the same inode number.
[tcarrigan@server
demo]$ ls -li link_test /tmp/link_new
2730074
-rw-rw-r--. 2 tcarrigan tcarrigan 12 Aug 29 14:27 link_test
2730074
-rw-rw-r--. 2 tcarrigan tcarrigan 12 Aug 29 14:27 /tmp/link_new
The shared inode number is 2730074, meaning these files are
identical data.
If you want more information on inodes, read my full article here.
Hard limits
While useful, there are some limitations to what hard links can do. For
starters, they can only be created for regular files (not directories or
special files). Also, a hard link cannot span multiple filesystems. They only
work when the new hard link exists on the same filesystem as the original.
How to Create Hard Links in
Linux
To create a hard
links in Linux, we will use ln utility. For
example, the following command creates a hard link named tp to the
file topprocs.sh.
$ ls -l
$ ln topprocs.sh tp
$ ls -l
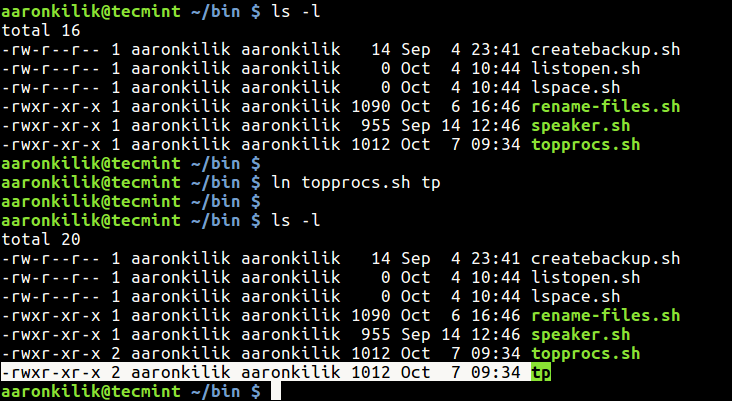 Create a Hard Link
to File
Create a Hard Link
to File
Looking at the output
above, using ls
command, the new file is not indicated as a link, it is shown as a regular
file. This implies that tp is just another regular
executable file that points to the same underlying inode as topprocs.sh.
To make a hard link
directly into a soft link, use the -P flag like this.
$ ln -P topprocs.sh tp
Symbolic
Links
A symlink (also
called a symbolic link) is a type of file in Linux that points to another file
or a folder on your computer. Symlinks are similar to shortcuts in Windows.
How to Create Symbolic Links in
Linux
To create a
symbolic links in Linux, we will use same ln utility with -s switch. For
example, the following command creates a symbolic link named topps.sh to the
file topprocs.sh.
$ ln -s ~/bin/topprocs.sh topps.sh
$ ls -l topps.sh
 Create a Symbolic
Link to File
Create a Symbolic
Link to File
From the above
output, you can see from the file permissions section that topps.sh is a link
indicated by l: meaning it is a link to another filename.
If the symbolic
link already exist, you may get an error, to force the operation (remove
exiting symbolic link), use the -f option.
$ ln -s ~/bin/topprocs.sh topps.sh
$ ln -sf ~/bin/topprocs.sh topps.sh
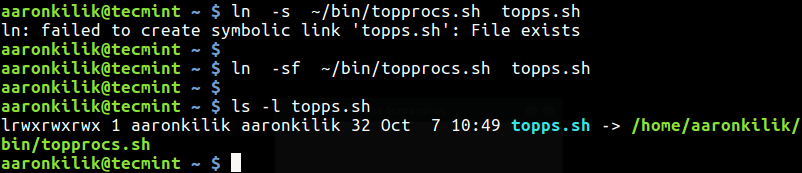 Forcefully Create
Symbolic Link
Forcefully Create
Symbolic Link
To enable verbose
mode, add the -v flag to prints the name of each linked file in the output.
$ ln -sfv ~/bin/topprocs.sh topps.sh
$ $ls -l topps.sh
 Enable Verbose in
Command Output
Enable Verbose in
Command Output
Unit-3
Shell introduction and Shell Scripting
UNIX / Linux : What Is a Shell? What are different
Shells?
by admin
What Is a Shell?
A shell is a program that provides an interface
between a user and an operating system (OS) kernel. An OS starts a shell for
each user when the user logs in or opens a terminal or console window.
A kernel is a program that:
·
Controls all computer operations.
·
Coordinates all executing utilities
·
Ensures that executing utilities do
not interfere with each other or consume all system resources.
·
Schedules and manages all system
processes.
By interfacing with a kernel, a shell provides a
way for a user to execute utilities and programs.
User Environment
The shell also provides a user environment that you
can customize using initialization files. These files contain settings for user
environment characteristics, such as:
·
Search paths for finding commands.
·
Default permissions on new files.
·
Values for variables that other
programs use.
·
Values that you can customize.
What are the different Shells?
The following sections describe OS shells mostly
available on UNIX/Linux Operating system. Shell features and their default
prompts are also described.
1. The Bourne Shell
The Bourne shell (sh), written by Steve Bourne at
AT&T Bell Labs, is the original UNIX shell. It is the preferred shell for
shell programming because of its compactness and speed. A Bourne shell drawback
is that it lacks features for interactive use, such as the ability to recall
previous commands (history). The Bourne shell also lacks built-in arithmetic
and logical expression handling.
The Bourne shell is the Solaris OS default shell.
It is the standard shell for Solaris system administration scripts. For the
Bourne shell the:
·
Command full-path name is /bin/sh and /sbin/sh.
·
Non-root user default prompt is $.
·
Root user default prompt is #.
2. The C Shell
The C shell (csh):
·
Is a UNIX enhancement written
by Bill Joy at the University of California at Berkeley.
·
Incorporated features for interactive
use, such as aliases and command history.
·
Includes convenient programming
features, such as built-in arithmetic and a C-like
expression syntax.
For the C shell the:
·
Command full-path name is /bin/csh.
·
Non-root user default prompt is
hostname %.
·
Root user default prompt is
hostname #.
3. The Korn Shell
The Korn shell (ksh):
·
Was written by David Korn at
AT&T Bell Labs
·
Is a superset of the Bourne shell.
·
Supports everything in the Bourne
shell.
·
Has interactive features comparable
to those in the C shell.
·
Includes convenient programming features
like built-in arithmetic and C-like arrays, functions,
and string-manipulation facilities.
·
Is faster than the C shell.
·
Runs scripts written for the Bourne
shell.
For the Korn shell the:
·
Command full-path name is /bin/ksh.
·
Non-root user default prompt is $.
·
Root user default prompt is #.
4. The GNU Bourne-Again Shell
The GNU Bourne-Again shell (bash):
·
Is compatible to the Bourne shell.
·
Incorporates useful features from the
Korn and C shells.
·
Has arrow keys that are automatically
mapped for command recall and editing.
For the GNU Bourne-Again shell the:
·
Command full-path name is /bin/bash.
·
Default prompt for a non-root user
is bash-x.xx$. (Where x.xx indicates the shell version number. For
example, bash-3.50$)
·
Root user default prompt is bash-x.xx#.
(Where x.xx indicates the shell version number. For example, bash-3.50$#)
Here is a short comparison of the all 4 shells and
their properties.
|
Shell |
Path |
Default Prompt (non-root user) |
Default Prompt (Root user) |
|
The Bourne Shell (sh) |
/bin/sh and /sbin/sh |
$ |
# |
|
The C Shell (csh) |
/bin/csh |
% |
# |
|
The Korn Shell (ksh) |
/bin/ksh |
$ |
# |
|
The GNU Bourne-Again Shell (Bash) |
/bin/bash |
bash-x.xx$ |
bash-x.xx# |
Linux Text Editors
Linux text editors can be used
for editing text files, writing codes, updating user instruction files, and
more. A Linux system supports multiple text editors. There are two types of
text editors in Linux, which are given below:
- Command-line text editors such as Vi, nano,
pico, and more.
- GUI text editors such as gedit (for
Gnome), Kwrite, and more.
A text editor plays an important role
while coding. So, it is important to select the best text editor. A text editor
should not only be simple but also functional and should be good to work with.
A text editor with IDE
features is considered as a good text editor.
- Ex – syntax
- Vi/VIM editor
- Nano editor
- Gedit editor
- Sublime text
editor
- VSCode
- GNU emacs
- Atom editor
- Brackets editor
- Pico editor
- Bluefish
- Kate/Kwrite
- Notepad ++
- Eclipse
- gVIM editor
- Jed editor
- Geany editor
- Leaf Pad
- Light Table
- Medit text
editor
- CodeLite
1.Vi/VIM editor
Vim editor is one of the most used and powerful command-line
based editor of the Linux system. By default, it is supported by most Linux
distros. It has enhanced functionalities of the old Unix Vi editor. It is a user-friendly editor and provides the same environment
for all the Linux distros. It is also termed as programmer's editor because most
programmers prefer Vi editor.
Vi editor has some special features such as Vi modes and syntax
highlighting that makes it powerful than other text editors. Generally, it has
two modes:
Command Mode: The command mode
allows us to perform actions on files. By default, it starts in command mode.
In this mode, all types of words are considered as commands. We can execute
commands in this mode.
Insert Mode: The insert mode
allows to insert text on files. To switch from command mode to insert mode,
press the Esc key to exit from active mode and 'i' key.
To learn more about Vi editor, visit the Vi editor with commands.
To invoke the vi editor, execute the vi command with the file
name as follows:
1.
vi <file name>
It will look like below image:

Modes of VI Editor in Unix
To have an easy working experience
with the VI editor we need to have some understanding about different modes of
operations of the VI editor.
Start Your Free Software Development Course
Web development, programming languages, Software testing & others
They are divided into three main
parts:
- Command
Mode
- Insert
Mode
- Escape
Mode
1. Command Mode
Command Mode is the first screen of VI editor. It is case
sensitive. Any character that is typed during this mode is treated as a
command. These are character are not visible on the window. We can cut, copy,
paste or delete a piece of text or even move through the file in this mode
[ESC] used to enter the Command Mode from another
mode (Insert Mode)
2. Insert Mode
We can easily move from Command mode
à Insert mode by pressing ‘i’ or ‘Insert’ key from the keyboard. Characters
typed in this mode is treated as input and add text to your file
Pressing ESC will
take you from Insert Mode -> Command Mode
Popular Course in this category
Course Price
₹4999 ₹27999
View Course
Related Courses
Linux Training Program (16 Courses, 3+
Projects)Red Hat Linux Training Program (4
Courses, 1+ Projects)
3. Escape Mode
Press [:] to move to
the escape mode. This mode is used to save the files & execution of the
commands
Fig :
Blue Box Represents the various modes on VI editor
Green Box Represents the
keys/commands to move from one mode to another
Syntax of VI Editor in Unix
VI Editor has various features for
easy editing in the Linux environment. The basic purpose of highlighting these
commands and their syntax is just to make oneself familiar with the
availability of various features. We do not need to mug up all the commands.
You can refer to the main pages for the details of the commands and the
options.
Now let us get going on the same:
1. Open/ Create a File
This will create a file with the name
‘filename’ or open the file with the name ‘filename’ if already exists.
Output:
Note: all the line starts with a tilde
(~) sign which represents the unused lines
2. Read-Only Mode
To open the file in read-only mode
use:
Output: At the bottom of the file you will see ‘Readonly’
3. Moving out of a file
|
:q |
Quit out of a file |
|
:q! |
Quit the file without saving the
changes |
|
:w |
Save the content of the editor |
|
:wq |
Save the changes and quit the
editor (*Combing the commands: q &: w) |
|
ZZ |
In command mode, this works similar
to wq |
4. Rename a File
:w newFileName – This will rename the file that you are currently
working into ‘new filename’. A command is used in Escape Mode.
5. Move within a file
To move around in a file without
actually editing the content of a file we must be in the Command mode and keep
the below commands handy.
|
h |
Moves the cursor left one character
position |
|
l |
Moves the cursor right one character
position |
|
k |
Moves the cursor one line up |
|
j |
Moves the cursor one line down |
**Arrows
can help you remember the functionality of that key. It has no other
significance.
Keyboard keys for movements within
the editor.
Note: Number at the beginning is equal to
the number of times you want the action to occur
Example: 2j will move the cursor two lines down from the
current cursor location\
6. Inserting or Adding Text
Following is the command used to put
the editor in the insert mode.
Once the ESC is
pressed it will take the editor back to command mode.
|
i |
Insert text before the cursor |
|
I |
Insert at the beginning of the
current line |
|
a |
Append after the cursor |
|
A |
Append at the end of the current
line |
|
o |
Open & places the text in a new
line below the current line |
|
O |
Open & places the text in a new
line above the current line |
7. Searching the Text
Similar to the find & replace
command in windows editor we have certain Search & replace command
available in the VI editor as well.
|
/string |
Search the mentioned ‘String’ in
the forward direction |
|
?string |
Search the mentioned ‘String’ in
the backward direction |
|
n |
Move to the next available position
of the searched string |
|
N |
Move to the next available position
of the searched string in the opposite direction |
8. Determining the Line Number
Having the line number is very useful
sometimes while editing the file. These commands are used in Escape Mode that
is after pressing the [:] key
|
:.= |
Line Number of the current line |
|
:= |
Gives the total number of lines |
|
^g |
Gives line number along with the
total number of lines in a file at the bottom of the screen |
9. Cutting & Pasting Text
These commands allow you to copy and
paste the text
|
yy |
Copy (yank, cut) the current line
into the buffer |
|
Nyy or yNy |
Copy ‘N’ lines along with the
current line into the buffer |
|
p |
Paste / Put the lines in the buffer
into the text after the current line |
Conclusion
Due to the availability of the VI
editor in all the Linux environment, learning VI editor can be really useful.
It can help us in creating and editing the scripts. We must be familiar with
the commands along with the particular mode in which that command is to be
used. This is not the end of the options available in VI editor keep exploring
as the challenge comes to your way.
Shell
Scripting Tutorial
A shell script is a
computer program designed to be run by the Unix/Linux shell which could be one
of the following:
- The Bourne Shell
- The C Shell
- The Korn Shell
- The GNU Bourne-Again Shell
A shell is a command-line
interpreter and typical operations performed by shell scripts include file
manipulation, program execution, and printing text.
Extended Shell Scripts
Shell scripts have
several required constructs that tell the shell environment what to do and when
to do it. Of course, most scripts are more complex than the above one.
The shell is, after
all, a real programming language, complete with variables, control structures,
and so forth. No matter how complicated a script gets, it is still just a list
of commands executed sequentially.
The following script
uses the read command which takes the input from the keyboard
and assigns it as the value of the variable PERSON and finally prints it on
STDOUT.
#!/bin/sh
# Author : Zara Ali
# Copyright (c) Tutorialspoint.com
# Script follows here:
echo "What is your name?"
read PERSON
echo "Hello, $PERSON"
Here is a sample run
of the script −
$./test.sh
What is your name?
Zara Ali
Hello, Zara Ali
$
Example Script
Assume we create
a test.sh script. Note all the scripts would have the .sh extension.
Before you add anything else to your script, you need to alert the system that
a shell script is being started. This is done using the shebang construct.
For example −
#!/bin/sh
This tells the system
that the commands that follow are to be executed by the Bourne shell. It's
called a shebang because the # symbol is called a hash, and
the ! symbol is called a bang.
To create a script
containing these commands, you put the shebang line first and then add the
commands −
#!/bin/bash
pwd
ls
Shell Comments
You can put your
comments in your script as follows −
#!/bin/bash
# Author : Zara Ali
# Copyright (c) Tutorialspoint.com
# Script follows here:
pwd
ls
Save the above
content and make the script executable −
$chmod +x test.sh
The shell script is
now ready to be executed −
$./test.sh
Upon execution, you
will receive the following result −
/home/amrood
index.htm
unix-basic_utilities.htm
unix-directories.htm
test.sh
unix-communication.htm
unix-environment.htm
Note − To execute a
program available in the current directory, use ./program_name
Extended Shell Scripts
Shell scripts have
several required constructs that tell the shell environment what to do and when
to do it. Of course, most scripts are more complex than the above one.
The shell is, after
all, a real programming language, complete with variables, control structures,
and so forth. No matter how complicated a script gets, it is still just a list
of commands executed sequentially.
The following script
uses the read command which takes the input from the keyboard
and assigns it as the value of the variable PERSON and finally prints it on
STDOUT.
#!/bin/sh
# Author : Zara Ali
# Copyright (c) Tutorialspoint.com
# Script follows here:
echo "What is your name?"
read PERSON
echo "Hello, $PERSON"
Here is a sample run
of the script −
$./test.sh
What is your name?
Zara Ali
Hello, Zara Ali
$
Unix / Linux
- Using Shell Variables
In this chapter, we
will learn how to use Shell variables in Unix. A variable is a character string
to which we assign a value. The value assigned could be a number, text,
filename, device, or any other type of data.
A variable is nothing
more than a pointer to the actual data. The shell enables you to create,
assign, and delete variables.
Variable Names
The name of a
variable can contain only letters (a to z or A to Z), numbers ( 0 to 9) or the
underscore character ( _).
By convention, Unix
shell variables will have their names in UPPERCASE.
The following
examples are valid variable names −
_ALI
TOKEN_A
VAR_1
VAR_2
Following are the
examples of invalid variable names −
2_VAR
-VARIABLE
VAR1-VAR2
VAR_A!
The reason you cannot
use other characters such as !, *, or - is
that these characters have a special meaning for the shell.
Defining Variables
Variables are defined
as follows −
variable_name=variable_value
For example −
NAME="Zara Ali"
The above example
defines the variable NAME and assigns the value "Zara Ali" to it.
Variables of this type are called scalar variables. A scalar
variable can hold only one value at a time.
Shell enables you to
store any value you want in a variable. For example −
VAR1="Zara Ali"
VAR2=100
Accessing Values
To access the value
stored in a variable, prefix its name with the dollar sign ($) −
For example, the
following script will access the value of defined variable NAME and print it on
STDOUT −
#!/bin/sh
NAME="Zara Ali"
echo $NAME
The above script will
produce the following value −
Zara Ali
Read-only Variables
Shell provides a way
to mark variables as read-only by using the read-only command. After a variable
is marked read-only, its value cannot be changed.
For example, the following
script generates an error while trying to change the value of NAME −
#!/bin/sh
NAME="Zara Ali"
readonly NAME
NAME="Qadiri"
The above script will
generate the following result −
/bin/sh: NAME: This variable is read only.
Unsetting Variables
Unsetting or deleting
a variable directs the shell to remove the variable from the list of variables
that it tracks. Once you unset a variable, you cannot access the stored value
in the variable.
Following is the
syntax to unset a defined variable using the unset command −
unset variable_name
The above command
unsets the value of a defined variable. Here is a simple example that
demonstrates how the command works −
#!/bin/sh
NAME="Zara Ali"
unset NAME
echo $NAME
The above example
does not print anything. You cannot use the unset command to unset variables
that are marked readonly.
Variable Types
When a shell is
running, three main types of variables are present −
· Local Variables − A local
variable is a variable that is present within the current instance of the
shell. It is not available to programs that are started by the shell. They are
set at the command prompt.
· Environment Variables − An
environment variable is available to any child process of the shell. Some
programs need environment variables in order to function correctly. Usually, a
shell script defines only those environment variables that are needed by the
programs that it runs.
· Shell Variables − A shell
variable is a special variable that is set by the shell and is required by the
shell in order to function correctly. Some of these variables are environment
variables whereas others are local variables.
·
For example, the $ character represents the
process ID number, or PID, of the current shell −
· $echo $$
·
·
The above command writes the PID of the current shell −
· 29949
·
The following table shows a number of special variables that you
can use in your shell scripts −
|
Sr.No. |
Variable
& Description |
|
1 |
$0 The filename of the current script. |
|
2 |
$n These variables correspond to the arguments with which a script
was invoked. Here n is a positive decimal number
corresponding to the position of an argument (the first argument is $1, the
second argument is $2, and so on). |
|
3 |
$# The number of arguments supplied to a script. |
|
4 |
$* All the arguments are double quoted. If a script receives two
arguments, $* is equivalent to $1 $2. |
|
5 |
$@ All the arguments are individually double quoted. If a script
receives two arguments, $@ is equivalent to $1 $2. |
|
6 |
$? The exit status of the last command executed. |
|
7 |
$$ The process number of the current shell. For shell scripts, this
is the process ID under which they are executing. |
|
8 |
$! The process number of the last background command. |
·
Command-Line Arguments
·
The command-line arguments $1, $2, $3, ...$9 are positional
parameters, with $0 pointing to the actual command, program, shell script, or
function and $1, $2, $3, ...$9 as the arguments to the command.
·
Following script uses various special variables related to the
command line −
· #!/bin/sh
·
· echo "File Name: $0"
· echo "First Parameter : $1"
· echo "Second Parameter : $2"
· echo "Quoted Values: $@"
· echo "Quoted Values: $*"
· echo "Total Number of Parameters : $#"
·
Here is a sample run for the above script −
· $./test.sh Zara Ali
· File Name : ./test.sh
· First Parameter : Zara
· Second Parameter : Ali
· Quoted Values: Zara Ali
· Quoted Values: Zara Ali
· Total Number of Parameters : 2
·
Special Parameters $* and $@
·
There are special parameters that allow accessing all the
command-line arguments at once. $* and $@ both
will act the same unless they are enclosed in double quotes, "".
·
Both the parameters specify the command-line arguments. However,
the "$*" special parameter takes the entire list as one argument with
spaces between and the "$@" special parameter takes the entire list
and separates it into separate arguments.
·
We can write the shell script as shown below to process an unknown
number of commandline arguments with either the $* or $@ special parameters −
· #!/bin/sh
·
· for TOKEN in $*
· do
· echo $TOKEN
· done
·
Here is a sample run for the above script −
· $./test.sh Zara Ali 10 Years Old
· Zara
· Ali
· 10
· Years
· Old
·
Note − Here do...done is a kind of loop that
will be covered in a subsequent tutorial.
·
Exit Status
·
The $? variable represents the exit status of the
previous command.
·
Exit status is a numerical value returned by every command upon
its completion. As a rule, most commands return an exit status of 0 if they
were successful, and 1 if they were unsuccessful.
·
Some commands return additional exit statuses for particular
reasons. For example, some commands differentiate between kinds of errors and
will return various exit values depending on the specific type of failure.
·
Following is the example of successful command −
· $./test.sh Zara Ali
· File Name : ./test.sh
· First Parameter : Zara
· Second Parameter : Ali
· Quoted Values: Zara Ali
· Quoted Values: Zara Ali
· Total Number of Parameters : 2
· $echo $?
· 0
· $
Defining Array Values
The difference
between an array variable and a scalar variable can be explained as follows.
Suppose you are
trying to represent the names of various students as a set of variables. Each
of the individual variables is a scalar variable as follows −
NAME01="Zara"
NAME02="Qadir"
NAME03="Mahnaz"
NAME04="Ayan"
NAME05="Daisy"
We can use a single
array to store all the above mentioned names. Following is the simplest method
of creating an array variable. This helps assign a value to one of its indices.
array_name[index]=value
Here array_name is
the name of the array, index is the index of the item in the
array that you want to set, and value is the value you want to set for that
item.
As an example, the
following commands −
NAME[0]="Zara"
NAME[1]="Qadir"
NAME[2]="Mahnaz"
NAME[3]="Ayan"
NAME[4]="Daisy"
If you are using
the ksh shell, here is the syntax of array initialization −
set -A array_name value1 value2 ... valuen
If you are using
the bash shell, here is the syntax of array initialization −
array_name=(value1 ... valuen)
Accessing Array Values
After you have set
any array variable, you access it as follows −
${array_name[index]}
Here array_name is
the name of the array, and index is the index of the value to
be accessed. Following is an example to understand the concept −
#!/bin/sh
NAME[0]="Zara"
NAME[1]="Qadir"
NAME[2]="Mahnaz"
NAME[3]="Ayan"
NAME[4]="Daisy"
echo "First Index: ${NAME[0]}"
echo "Second Index: ${NAME[1]}"
The above example
will generate the following result −
$./test.sh
First Index: Zara
Second Index: Qadir
You can access all
the items in an array in one of the following ways −
${array_name[*]}
${array_name[@]}
Here array_name is
the name of the array you are interested in. Following example will help you
understand the concept −
#!/bin/sh
NAME[0]="Zara"
NAME[1]="Qadir"
NAME[2]="Mahnaz"
NAME[3]="Ayan"
NAME[4]="Daisy"
echo "First Method: ${NAME[*]}"
echo "Second Method: ${NAME[@]}"
The above example
will generate the following result −
$./test.sh
First Method: Zara Qadir Mahnaz Ayan Daisy
Second Method: Zara Qadir Mahnaz Ayan Daisy
There are various
operators supported by each shell. We will discuss in detail about Bourne shell
(default shell) in this chapter.
We will now discuss
the following operators −
- Arithmetic Operators
- Relational Operators
- Boolean Operators
- String Operators
- File Test Operators
Bourne shell didn't
originally have any mechanism to perform simple arithmetic operations but it
uses external programs, either awk or expr.
The following example
shows how to add two numbers −
#!/bin/sh
val=`expr 2 + 2`
echo "Total value : $val"
The above script will
generate the following result −
Total value : 4
The following points
need to be considered while adding −
· There must be spaces
between operators and expressions. For example, 2+2 is not correct; it should
be written as 2 + 2.
· The complete
expression should be enclosed between ‘ ‘, called the backtick.
Arithmetic Operators
The following
arithmetic operators are supported by Bourne Shell.
Assume variable a holds
10 and variable b holds 20 then −
|
Operator |
Description |
Example |
|
+ (Addition) |
Adds values on either side of
the operator |
`expr $a + $b` will give 30 |
|
- (Subtraction) |
Subtracts right hand operand
from left hand operand |
`expr $a - $b` will give -10 |
|
* (Multiplication) |
Multiplies values on either
side of the operator |
`expr $a \* $b` will give 200 |
|
/ (Division) |
Divides left hand operand by
right hand operand |
`expr $b / $a` will give 2 |
|
% (Modulus) |
Divides left hand operand by
right hand operand and returns remainder |
`expr $b % $a` will give 0 |
|
= (Assignment) |
Assigns right operand in left
operand |
a = $b would assign value of b
into a |
|
== (Equality) |
Compares two numbers, if both
are same then returns true. |
[ $a == $b ] would return
false. |
|
!= (Not Equality) |
Compares two numbers, if both
are different then returns true. |
[ $a != $b ] would return true. |
It is very important
to understand that all the conditional expressions should be inside square
braces with spaces around them, for example [ $a == $b ] is
correct whereas, [$a==$b] is incorrect.
All the arithmetical
calculations are done using long integers.
Relational Operators
Bourne Shell supports
the following relational operators that are specific to numeric values. These
operators do not work for string values unless their value is numeric.
For example,
following operators will work to check a relation between 10 and 20 as well as
in between "10" and "20" but not in between "ten"
and "twenty".
Assume variable a holds
10 and variable b holds 20 then −
|
Operator |
Description |
Example |
|
-eq |
Checks if the value of two
operands are equal or not; if yes, then the condition becomes true. |
[ $a -eq $b ] is not true. |
|
-ne |
Checks if the value of two
operands are equal or not; if values are not equal, then the condition
becomes true. |
[ $a -ne $b ] is true. |
|
-gt |
Checks if the value of left
operand is greater than the value of right operand; if yes, then the
condition becomes true. |
[ $a -gt $b ] is not true. |
|
-lt |
Checks if the value of left
operand is less than the value of right operand; if yes, then the condition
becomes true. |
[ $a -lt $b ] is true. |
|
-ge |
Checks if the value of left
operand is greater than or equal to the value of right operand; if yes, then
the condition becomes true. |
[ $a -ge $b ] is not true. |
|
-le |
Checks if the value of left
operand is less than or equal to the value of right operand; if yes, then the
condition becomes true. |
[ $a -le $b ] is true. |
It is very important
to understand that all the conditional expressions should be placed inside
square braces with spaces around them. For example, [ $a <= $b ] is
correct whereas, [$a <= $b] is incorrect.
Boolean Operators
The following Boolean
operators are supported by the Bourne Shell.
Assume variable a holds
10 and variable b holds 20 then −
|
Operator |
Description |
Example |
|
! |
This is logical negation. This
inverts a true condition into false and vice versa. |
[ ! false ] is true. |
|
-o |
This is logical OR.
If one of the operands is true, then the condition becomes true. |
[ $a -lt 20 -o $b -gt 100 ] is
true. |
|
-a |
This is logical AND.
If both the operands are true, then the condition becomes true otherwise
false. |
[ $a -lt 20 -a $b -gt 100 ] is
false. |
String Operators
The following string
operators are supported by Bourne Shell.
Assume variable a holds
"abc" and variable b holds "efg" then −
|
Operator |
Description |
Example |
|
= |
Checks if the value of two
operands are equal or not; if yes, then the condition becomes true. |
[ $a = $b ] is not true. |
|
!= |
Checks if the value of two
operands are equal or not; if values are not equal then the condition becomes
true. |
[ $a != $b ] is true. |
|
-z |
Checks if the given string
operand size is zero; if it is zero length, then it returns true. |
[ -z $a ] is not true. |
|
-n |
Checks if the given string
operand size is non-zero; if it is nonzero length, then it returns true. |
[ -n $a ] is not false. |
|
str |
Checks if str is
not the empty string; if it is empty, then it returns false. |
[ $a ] is not false. |
File Test Operators
We have a few
operators that can be used to test various properties associated with a Unix
file.
Assume a
variable file holds an existing file name "test" the
size of which is 100 bytes and has read, write and execute permission
on −
|
Operator |
Description |
Example |
|
-b file |
Checks if file is a block
special file; if yes, then the condition becomes true. |
[ -b $file ] is false. |
|
-c file |
Checks if file is a character
special file; if yes, then the condition becomes true. |
[ -c $file ] is false. |
|
-d file |
Checks if file is a directory;
if yes, then the condition becomes true. |
[ -d $file ] is not true. |
|
-f file |
Checks if file is an ordinary
file as opposed to a directory or special file; if yes, then the condition
becomes true. |
[ -f $file ] is true. |
|
-g file |
Checks if file has its set
group ID (SGID) bit set; if yes, then the condition becomes true. |
[ -g $file ] is false. |
|
-k file |
Checks if file has its sticky
bit set; if yes, then the condition becomes true. |
[ -k $file ] is false. |
|
-p file |
Checks if file is a named pipe;
if yes, then the condition becomes true. |
[ -p $file ] is false. |
|
-t file |
Checks if file descriptor is
open and associated with a terminal; if yes, then the condition becomes true. |
[ -t $file ] is false. |
|
-u file |
Checks if file has its Set User
ID (SUID) bit set; if yes, then the condition becomes true. |
[ -u $file ] is false. |
|
-r file |
Checks if file is readable; if
yes, then the condition becomes true. |
[ -r $file ] is true. |
|
-w file |
Checks if file is writable; if
yes, then the condition becomes true. |
[ -w $file ] is true. |
|
-x file |
Checks if file is executable;
if yes, then the condition becomes true. |
[ -x $file ] is true. |
|
-s file |
Checks if file has size greater
than 0; if yes, then condition becomes true. |
[ -s $file ] is true. |
|
-e file |
Checks if file exists; is true
even if file is a directory but exists. |
Linux system
call in Detail
A system
call is a procedure that provides the interface
between a process and the operating system. It is the way by which a computer
program requests a service from the kernel of the operating system.
Different operating systems execute different
system calls.
System calls are divided into 5 categories mainly :
·
Process Control
·
File Management
·
Device Management
·
Information Maintenance
·
Communication

Process Control :
This system calls perform the task of process
creation, process termination, etc.
The Linux System calls under this are fork() , exit() , exec().
·
fork()
·
A new process is created by the fork() system call.
·
A new process may be created with fork() without a
new program being run-the new sub-process simply continues to execute exactly
the same program that the first (parent) process was running.
·
It is one of the most widely used system calls
under process management.
·
exit()
·
The exit() system call is used by a program to
terminate its execution.
·
The operating system reclaims resources that were
used by the process after the exit() system call.
·
exec()
·
A new program will start executing after a call to
exec()
·
Running a new program does not require that a new
process be created first: any process may call exec() at any time. The
currently running program is immediately terminated, and the new program starts
executing in the context of the existing process.
File Management :
File management system calls handle file
manipulation jobs like creating a file, reading, and writing, etc. The Linux
System calls under this are open(), read(), write(),
close().
·
open():
·
It is the system call to open a file.
·
This system call just opens the file, to perform
operations such as read and write, we need to execute different system call to
perform the operations.
·
read():
·
This system call opens the file in reading mode
·
We can not edit the files with this system call.
·
Multiple processes can execute the read() system
call on the same file simultaneously.
·
write():
·
This system call opens the file in writing mode
·
We can edit the files with this system call.
·
Multiple processes can not execute the write()
system call on the same file simultaneously.
·
close():
·
This system call closes the opened file.
Device Management :
Device management does the job of device
manipulation like reading from device buffers, writing into device buffers,
etc. The Linux System calls under this is ioctl().
·
ioctl():
·
ioctl() is referred to as Input and Output Control.
·
ioctl is a system call for device-specific
input/output operations and other operations which cannot be expressed by
regular system calls.
Information
Maintenance:
It handles information and its transfer between the
OS and the user program. In addition, OS keeps the information about all its
processes and system calls are used to access this information. The System
calls under this are getpid(), alarm(), sleep().
·
getpid():
·
getpid stands for Get the Process ID.
·
The getpid() function shall return the process ID
of the calling process.
·
The getpid() function shall always be successful
and no return value is reserved to indicate an error.
·
alarm():
·
This system call sets an alarm clock for the
delivery of a signal that when it has to be reached.
·
It arranges for a signal to be delivered to the
calling process.
·
sleep():
·
This System call suspends the execution of the
currently running process for some interval of time
·
Meanwhile, during this interval, another process is
given chance to execute
Communication :
These types of system calls are specially used for
inter-process communications.
Two models are used for inter-process communication
1.
Message Passing(processes exchange messages with
one another)
2.
Shared memory(processes share memory region to
communicate)
The system calls under this are pipe() , shmget() ,mmap().
·
pipe():
·
The pipe() system call is used to communicate
between different Linux processes.
·
It is mainly used for inter-process communication.
·
The pipe() system function is used to open file descriptors.
·
shmget():
·
shmget stands for shared memory segment.
·
It is mainly used for Shared memory communication.
·
This system call is used to access the shared
memory and access the messages in order to communicate with the process.
·
mmap():
·
This function call is used to map or unmap files or
devices into memory.
·
The mmap() system call is responsible for mapping
the content of the file to the virtual memory space of the process.
Pipes and
Filters in Linux/Unix
- Last Updated : 30 Jun, 2020
The novel idea of Pipes was
introduced by M.D Mcllory in June 1972– version 2, 10 UNIX installations. Piping is
used to give the output of one command (written on LHS) as input to another
command (written on RHS). Commands are piped together using vertical bar “ | ” symbol.
Syntax:
command 1|command 2
Example:
·
Input: ls|more
·
Output: more command takes input from ls command and appends it to the standard output.
It displays as many files that fit on the screen and highlighted more at the bottom of the screen. To see the next
screen hit enter or space bar to move one line at a time or one screen at a
time respectively.
In UNIX/Linux, filters are the set of
commands that take input from standard input stream i.e. stdin, perform some operations and write output to
standard output stream i.e. stdout. The stdin
and stdout can be managed as per preferences using redirection and pipes.
Common filter commands are: grep, more, sort.
1. grep Command:It is a pattern or expression matching command. It
searches for a pattern or regular expression that matches in files or
directories and then prints found matches.
Syntax:
$grep[options] "pattern to be matched" filename
Example:
Input :
$grep 'hello' ist_file.txt
Output :
searches hello in the ist_file.txt and outputs/returns the lines containing
'hello'.

The Options in grep co mmand are:
Grep command can also be used
with meta-characters:
Example:
Input :
$grep 'hello' *
Output :
it searches for hello in all the files and
directories.
* is
a meta-character and returns matching 0 or more preceding characters
2. sort Command: It is a data manipulation command that sorts
or merges lines in a file by specified fields. In other words it sorts lines of
text alphabetically or numerically, default sorting is alphabetical.
Syntax:
$sort[options] filename
The options include:

Example:
$sort fruits.txt
$sort -n grades.txt

3. more Command: It is used to customize the displaying
contents of file. It displays the text file contents on the terminal with
paging controls. Following key controls are used:
·
To display next line, press the enter
key
·
To bring up next screen, press
spacebar
·
To move to the next file, press n
·
To quit, press q.
Syntax:
$more[options] filename
Example:
cat fruits.txt | more

While using more command, the bottom
of the screen contains more prompt where commands are entered to move through
the text.
Unit-4
Unix Control Structures and
Utilities:
Decision Making
As in popular programming languages, the shell also supports logical
decision making.
The basic conditional decision making construct is:
if [ expression ]; then
code if 'expression' is true
fi
NAME="John"
if [ "$NAME" = "John" ]; then
echo "True - my name is
indeed John"
fi
It can be expanded with 'else'
NAME="Bill"
if [ "$NAME" = "John" ]; then
echo "True - my name is
indeed John"
else
echo "False"
echo "You must mistaken
me for $NAME"
fi
It can be expanded with 'elif' (else-if)
NAME="George"
if [ "$NAME" = "John" ]; then
echo "John Lennon"
elif [ "$NAME" = "George" ]; then
echo "George
Harrison"
else
echo "This leaves us
with Paul and Ringo"
fi
The expression used by the conditional construct is evaluated to either
true or false. The expression can be a single string or variable. A empty
string or a string consisting of spaces or an undefined variable name, are
evaluated as false. The expression can be a logical combination of comparisons:
negation is denoted by !, logical AND (conjunction) is denoted by &&,
and logical OR (disjunction) is denoted by ||. Conditional expressions should
be surrounded by double brackets [[ ]].
Types of numeric comparisons
comparison Evaluated to true
when
$a -lt $b $a < $b
$a -gt $b $a > $b
$a -le $b $a <= $b
$a -ge $b $a >= $b
$a -eq $b $a is
equal to $b
$a -ne $b $a is
not equal to $b
Types of string comparisons
comparison Evaluated to true
when
"$a" = "$b" $a is
the same as $b
"$a" == "$b" $a is
the same as $b
"$a" != "$b" $a is
different from $b
-z "$a" $a is
empty
- note1:
whitespace around = is required
- note2:
use "" around string variables to avoid shell expansion of
special characters as *
Logical combinations
if [[ $VAR_A[0] -eq
1 && ($VAR_B = "bee" || $VAR_T = "tee") ]] ; then
command...
fi
case structure
case "$variable" in
"$condition1" )
command...
;;
"$condition2" )
command...
;;
esac
simple case bash structure
mycase=1
case $mycase in
1) echo "You selected
bash";;
2) echo "You selected
perl";;
3) echo "You selected
phyton";;
4) echo "You selected
c++";;
5) exit
esac
The syntax for the switch case in shell scripting can be represented in two
ways one is single pattern expression and multi-pattern expression let’s have a
look now.
First Syntax Method
Now, we will have a look at the
syntax of the switch case conditional statement with a single pattern.
Syntax:
case $var in
pattern) commands to execute;;
pattern1) commands to execute;;
pattern2) commands to execute;;
pattern3) commands to execute;;
*)
Default condition and commands to execute;;
esac
In the above switch case syntax, $var
in the pattern is a conditional expression if it evaluates to true commands
corresponding to it will execute like that it will check for all conditional
patterns if nothing satisfies or evaluates to true then commands in default condition
will execute. The default condition is optional but it better to have it. When
one condition matches then “;;” indicates control needs to go the end of the
switch case statement.
Second Syntax Method
Now, we will have a look at the
syntax of the switch case conditional statement with multiple patternsR
Syntax:
case $var in
pattern|pattern1|pattern2) list of commands need to execute;;
pattern3| pattern4| pattern5) list of commands need to execute;;
pattern6) commands need to execute;;
*)
Default condition and statements need to execute
esac
In the above switch case syntax
method, we are having a single $var comparing against multiple patterns with an
or condition. If one of the condition matches it evaluates to true then
corresponding statements will execute until the “;;” which indicates the end of
that conditional statement. *) indicates the start of the default condition and
statements need to execute and esac indicates the end of the switch case. We can include wild characters, regex in the
patterns. The conditional check will happen continuously until it finds a
pattern otherwise default statement will execute.
Flow Diagram for Switch Case
The flow diagram of the switch case
in shell scripting is like below and we will explain with a simple example too.
An example of the switch case statement is explained below.
Code:
fruit = “kiwi”
case $fruit” in “apple”) echo “apple is tasty”;;
“banana”) echo “I like banana”;;
“kiwi”) echo ”Newzeland is famous for kiwi”;;
*)
Echo “default case”;;
esac
Flow Diagram:

In the above switch case example, we
have a variable with kiwi as value and we have 3 patterns. It doesn’t satisfy
or evaluates to true in the first 2 conditional statements and evaluates to
true in the third conditional statement and executes the statement and control
reaches the end of the switch case statement. In the above example first,
conditional pattern is apple which is not equal to kiwi so it evaluates to
false and second one is banana that also doesn’t matches and evaluates to false
and the third statement is kiwi and it matches if it also doesn’t matches then
it will execute default statement in the switch case and finally it comes to
end of the switch case.
Output:
How Switch Case Works in Shell
Scripting?
We have discussed already what a switch
case, its syntax is. Now, we will see in detail how it will work in shell
scripting. Initially, we initialize a variable with an expression or value and
conditional statement checks whether it satisfies any condition, if yes then it
will execute the corresponding commands until it finds the ;; which indicates
the end of the commands of that condition. It will check the condition until it
satisfies otherwise it will exit the switch case. If there is a default case
then it will execute the commands in it instead of exiting from the switch
case. Let’s have a simple example and see how it works as below:
Let’s have a simple example and see
how it works as below:
Code:
mode = “jeep”;
case $mode in “lorry") echo "For $mode, rent is Rs.40 per
k/m.";;
"jeep") echo "For $mode, rent is Rs.30 per k/m.";;
*) echo "Sorry, I cannot get a $mode rent for you!";;
esac
In the above example, the variable
mode is initialized with jeep and it checks all the conditions in switch case
and executes the command which it satisfies and then it exits the switch case
statement. In this case, it satisfies the condition jeep and executes the
commands with a display message and comes out of the switch case statement.
Output:
Examples of Switch Case in Shell
Scripting
Let’s have a look different at switch
case examples and how they are working, what each example is trying to do with
an explanation as follows.
Example #1
In this example, we are trying to
tell the computer that it needs to do which backup based on the date.
Code:
NOW=$(date
+"%a")
case $NOW in Mon) echo "Full backup";;
Tue|Wed|Thu|Fri) echo "Partial backup";;
Sat|Sun) echo "No backup";;
*) ;;
esac
In the above example, we assigned now
with a day and we are checking the statements, here the day is assigned
dynamically so the output of this program will change based on the day you
execute this program. In this case, it will display partial backup as output.
Output:
Partial backup.
Example #2
In this example, we are trying to
know the fare of a vehicle based on its type like bike, jeep, bicycle, car etc.
Code:
mode = “bike”;
case $mode in "sportscar") echo "For $mode, rent is Rs.20 per
k/m.";;
"lorry") echo "For $mode, rent is Rs.50 per k/m.";;
"sumo") echo "For $mode, rent is Rs.30 per k/m.";;
"bicycle") echo "For $mode, rent is Rs. 5 per k/m.";;
*) echo "Sorry, I can not get a $mode rent for you!";;
esac
In the above example, we have a bike
in the variable and checking against all the conditions but unfortunately, we
didn’t find any match the conditions. So it will execute the default commands
of the switch case and come out of it. In this case, it displays a sorry
message.
Output:
Sorry, I can not get
a bick rental for ypu !
Example #3
In this above let’s try to pass an
argument to the shell script, and the argument will be compared against the
conditions.
Code:
option="${1}"
case ${option} in -f) file="${2}" echo "file name is $file"
;;
-d) dir="${2}" echo "dir name is $dir" ;; *)
esac
In the above example, we will pass an
argument to the shell script and according to the argument, it will execute
either the file or directory by default it displays the usage of the shell
script. If we pass –f and filename it displays the file name, etc.
Output:
$ ./test.sh -f index.htm
File name is index.htm
Loops
bash for loop
# basic construct
for arg
in [list]
do
command(s)...
done
For each pass through the loop, arg takes on the value of each
successive value in the list. Then the command(s) are executed.
# loop on array member
NAMES=(Joe
Jenny Sara Tony)
for N in ${NAMES[@]} ; do
echo "My name is $N"
done
# loop on command output results
for f in $(
ls prog.sh /etc/localtime ) ; do
echo "File is: $f"
done
bash while loop
# basic construct
while [
condition ]
do
command(s)...
done
The while construct tests for a condition, and if true, executes commands.
It keeps looping as long as the condition is true.
COUNT=4
while [ $COUNT -gt
0 ]; do
echo "Value of count
is: $COUNT"
COUNT=$(($COUNT - 1))
done
bash until loop
# basic construct
until [
condition ]
do
command(s)...
done
The until construct tests for a condition, and if false, executes
commands. It keeps looping as long as the condition is false (opposite of while
construct)
COUNT=1
until [ $COUNT -gt
5 ]; do
echo "Value of count
is: $COUNT"
COUNT=$(($COUNT + 1))
done
"break" and "continue"
statements
break and continue can be used to control the loop execution of for,
while and until constructs. continue is used to skip the rest of a particular
loop iteration, whereas break is used to skip the entire rest of loop. A few
examples:
# Prints out 0,1,2,3,4
COUNT=0
while [ $COUNT -ge
0 ]; do
echo "Value of COUNT
is: $COUNT"
COUNT=$((COUNT+1))
if [ $COUNT -ge 5 ] ; then
break
fi
done
# Prints out only odd numbers -
1,3,5,7,9
COUNT=0
while [ $COUNT -lt
10 ]; do
COUNT=$((COUNT+1))
# Check if COUNT is even
if [ $(($COUNT % 2)) = 0 ] ; then
continue
fi
echo $COUNT
done
Unix / Linux
- Shell Functions
Creating Functions
To declare a
function, simply use the following syntax −
function_name () {
list of
commands
}
The name of your
function is function_name, and that's what you will use to call it
from elsewhere in your scripts. The function name must be followed by
parentheses, followed by a list of commands enclosed within braces.
Example
Following example
shows the use of function −
#!/bin/sh
# Define your function here
Hello () {
echo "Hello World"
}
# Invoke your function
Hello
Upon execution, you
will receive the following output −
$./test.sh
Hello World
Pass Parameters to a Function
You can define a
function that will accept parameters while calling the function. These
parameters would be represented by $1, $2 and so
on.
Following is an
example where we pass two parameters Zara and Ali and
then we capture and print these parameters in the function.
#!/bin/sh
# Define your function here
Hello () {
echo "Hello World $1 $2"
}
# Invoke your function
Hello Zara Ali
Upon execution, you
will receive the following result −
$./test.sh
Hello World Zara Ali
Returning Values from Functions
If you execute
an exit command from inside a function, its effect is not only
to terminate execution of the function but also of the shell program that
called the function.
If you instead want
to just terminate execution of the function, then there is way to come out of a
defined function.
Based on the
situation you can return any value from your function using the return command
whose syntax is as follows −
return code
Here code can
be anything you choose here, but obviously you should choose something that is
meaningful or useful in the context of your script as a whole.
Example
Following function
returns a value 10 −
#!/bin/sh
# Define your function here
Hello () {
echo "Hello World $1 $2"
return 10
}
# Invoke your function
Hello Zara Ali
# Capture value returnd by last command
ret=$?
echo "Return value is $ret"
Upon execution, you
will receive the following result −
$./test.sh
Hello World Zara Ali
Return value is 10
Nested Functions
One of the more
interesting features of functions is that they can call themselves and also
other functions. A function that calls itself is known as a recursive
function.
Following example
demonstrates nesting of two functions −
#!/bin/sh
# Calling one function from another
number_one () {
echo "This is the first function
speaking..."
number_two
}
number_two () {
echo "This is now the second function
speaking..."
}
# Calling function one.
number_one
Upon execution, you
will receive the following result −
This is the first function speaking...
This is now the second function speaking...
Function Call from Prompt
You can put
definitions for commonly used functions inside your .profile.
These definitions will be available whenever you log in and you can use them at
the command prompt.
Alternatively, you
can group the definitions in a file, say test.sh, and then
execute the file in the current shell by typing −
$. test.sh
This has the effect
of causing functions defined inside test.sh to be read
and defined to the current shell as follows −
$ number_one
This is the first function speaking...
This is now the second function speaking...
$
To remove the
definition of a function from the shell, use the unset command with the .f option.
This command is also used to remove the definition of a variable to the shell.
$ unset -f function_name
cut command
in Linux with examples
- Difficulty
Level : Medium
- Last Updated : 19 Feb, 2021
The cut command in UNIX is a command
for cutting out the sections from each line of files and writing the result to
standard output. It can be used to cut parts of a line by byte position, character and field. Basically the cut
command slices a line and extracts the text. It is necessary to specify option
with command otherwise it gives error. If more than one file name is provided
then data from each file is not precedes by
its file name.
Syntax:
cut OPTION... [FILE]...
Let us consider two files having
name state.txt and capital.txt contains
5 names of the Indian states and capitals respectively.
$ cat state.txt
Andhra Pradesh
Arunachal Pradesh
Assam
Bihar
Chhattisgarh
Without any option specified it
displays error.
$ cut state.txt
cut: you must specify a
list of bytes, characters, or fields
Try 'cut --help' for
more information.
How
to Use the cut Command
The syntax for
the cut command
is as follows:
cut OPTION... [FILE]...
Copy
The options that
tell cut whether
to use a delimiter, byte position, or character when cutting out selected
portions the lines are as follows:
- -f (--fields=LIST) - Select by specifying a field, a set of
fields, or a range of fields. This is the most commonly used option.
- -b (--bytes=LIST) - Select by specifying a byte, a set of
bytes, or a range of bytes.
- -c (--characters=LIST) - Select by specifying a
character, a set of characters, or a range of characters.
You can use one,
and only one of the options listed above.
Other options are:
- -d (--delimiter) - Specify a delimiter that will be used
instead of the default “TAB” delimiter.
- --complement -
Complement the selection. When using this option cut displays all bytes, characters, or
fields except the selected.
- -s (--only-delimited) - By default cut prints the lines that contain no
delimiter character. When this option is used, cut doesn’t print lines not containing
delimiters.
- --output-delimiter -
The default behavior of cut is
to use the input delimiter as the output delimiter. This option allows you
to specify a different output delimiter string.
The cut command
can accept zero or more input FILE names. If no FILE is
specified, or when FILE is -, cut will
read from the standard input.
The LIST argument
passed to the -f, -b,
and -c options
can be an integer, multiple integers separated by commas, a range of integers
or multiple integer ranges separated by commas. Each range can be one of the
following:
- N the
Nth field, byte or character, starting from 1.
- N- from
the Nth field, byte or character, to the end of the line.
- N-M from
the Nth to the Mth field, byte, or character.
- -M from
the first to the Mth field, byte, or character.
How
to Cut by Field
To specify the
fields that should be cut invoke the command with the -f option.
When not specified, the default delimiter is “TAB”.
In the examples
below, we will use the following file. The fields are separated by tabs.
test.txt
245:789 4567 M:4540
Admin 01:10:1980
535:763 4987 M:3476
Sales 11:04:1978
Copy
For example, to
display the 1st and the 3rd field you would use:
cut test.txt -f 1,3Copy
245:789 M:4540
535:763 M:3476
Paste command
in Linux with examples
- Difficulty
Level : Easy
- Last Updated : 19 Feb, 2021
Paste command is one of the useful
commands in Unix or Linux operating system. It is used to join files
horizontally (parallel merging) by outputting lines consisting of lines from
each file specified, separated by tab as
delimiter, to the standard output. When no file is specified, or put dash (“-“)
instead of file name, paste reads from standard input and gives output as it is
until a interrupt command [Ctrl-c] is
given.
Syntax:
paste [OPTION]... [FILES]...
Let us consider three files having
name state, capital and number. state and capital file contains 5 names of the Indian states
and capitals respectively. number file
contains 5 numbers.
$ cat state
Arunachal Pradesh
Assam
Andhra Pradesh
Bihar
Chhattisgrah
$ cat capital
Itanagar
Dispur
Hyderabad
Patna
Raipur
Without any option paste merges the
files in parallel. The paste command writes corresponding lines from the files
with tab as a deliminator on the terminal.
$ paste number state capital
1 Arunachal Pradesh Itanagar
2 Assam
Dispur
3 Andhra Pradesh Hyderabad
4 Bihar
Patna
5 Chhattisgrah Raipur
In the above command three files are
merges by paste command.
Options:
1. -d (delimiter): Paste command uses the tab delimiter by
default for merging the files. The delimiter can be changed to any other
character by using the -d option. If
more than one character is specified as delimiter then paste uses it in a
circular fashion for each file line separation.
Only one character is specified
$ paste -d "|" number state
capital
1|Arunachal
Pradesh|Itanagar
2|Assam|Dispur
3|Andhra
Pradesh|Hyderabad
4|Bihar|Patna
5|Chhattisgrah|Raipur
More than one character is specified
$ paste -d "|," number state
capital
1|Arunachal
Pradesh,Itanagar
2|Assam,Dispur
3|Andhra
Pradesh,Hyderabad
4|Bihar,Patna
5|Chhattisgrah,Raipur
First and second file
is separated by '|' and second and third is separated by ','.
After that list is
exhausted and reused.
2. -s (serial): We can merge the files in sequentially manner
using the -s option. It reads all the lines from a single file and merges all
these lines into a single line with each line separated by tab. And these
single lines are separated by newline.
$ paste -s number state capital
1 2
3 4 5
Arunachal Pradesh Assam
Andhra Pradesh Bihar Chhattisgrah
Itanagar Dispur
Hyderabad Patna Raipur
In the above command, first it reads
data from number file and merge them
into single line with each line separated by tab. After that newline character
is introduced and reading from next file i.e. state starts
and process repeats again till all files are read.
Combination of -d and -s: The following example shows how to specify a
delimiter for sequential merging of files:
$ paste -s -d ":" number
state capital
1:2:3:4:5
Arunachal
Pradesh:Assam:Andhra Pradesh:Bihar:Chhattisgrah
Itanagar:Dispur:Hyderabad:Patna:Raipur
3. –version: This option is used to display the version of
paste which is currently running on your system.
$ paste --version
paste (GNU coreutils)
8.26
Packaged by Cygwin
(8.26-2)
Copyright (C) 2016 Free
Software Foundation, Inc.
License GPLv3+: GNU GPL
version 3 or later .
This is free software:
you are free to change and redistribute it.
There is NO WARRANTY,
to the extent permitted by law.
Written by David M.
Ihnat and David MacKenzie.
Applications of Paste Command
1. Combining N consecutive lines: The paste command can also be used to merge N
consecutive lines from a file into a single line. Here N can be specified by
specifying number hyphens(-) after paste.
With 2 hyphens
$ cat capital | paste - -
Itanagar Dispur
Hyderabad Patna
Raipur
With 3 hyphens
$ paste - - - < capital
Itanagar Dispur
Hyderabad
Patna Raipur
2. Combination with other commands: Even though paste require
at least two files for concatenating lines, but data from one file can be given
from shell. Like in our example below, cut command is
used with -f option for cutting out
first field of state file and output is pipelined
with paste command having one file name and instead of second file name hyphen
is specified.
Note: If
hyphen is not specified then input from shell is not pasted.
Without hypen
$ cut -d " " -f 1 state |
paste number
1
2
3
4
5
With hypen
$ cut -d " " -f 1 state |
paste number -
1 Arunachal
2 Assam
3 Andhra
4 Bihar
5 Chhattisgrah
Ordering of pasting can be changed by
altering the location of hyphen:
$ cut -d " " -f 1 state |
paste - number
Arunachal 1
Assam 2
Andhra 3
Bihar 4
Chhattisgrah 5
join Command
in Linux
- Difficulty
Level : Medium
- Last Updated : 22 May, 2019
The join command in UNIX is a command
line utility for joining lines of two files on a common field.
Suppose you have two files and there
is a need to combine these two files in a way that the output makes even more
sense.For example, there could be a file containing names and the other
containing ID’s and the requirement is to combine both files in such a way that
the names and corresponding ID’s appear in the same line. join command is the tool for it. join command is used to join the two files based
on a key field present in both the files. The input file can
be separated by white space or any delimiter.
Syntax:
$join [OPTION] FILE1 FILE2
Example : Let us assume there are two files file1.txt
and file2.txt and we want to combine the contents of these two files.
// displaying the
contents of first file //
$cat file1.txt
1 AAYUSH
2 APAAR
3 HEMANT
4 KARTIK
// displaying contents
of second file //
$cat file2.txt
1 101
2 102
3 103
4 104
Now, in order to combine two files
the files must have some common field. In this case, we have the numbering 1,
2... as the common field in both the files.
NOTE : When using join command, both the input files
should be sorted on the KEY on which we are going to join the files.
//..using join
command...//
$join file1.txt file2.txt
1 AAYUSH 101
2 APAAR 102
3 HEMANT 103
4 KARTIK 104
// by default join
command takes the
first column as the key
to join as
in the above case //
So, the output contains the key
followed by all the matching columns from the first file file1.txt, followed by
all the columns of second file file2.txt.
Now, if we wanted to create a new
file with the joined contents, we could use the following command:
$join file1.txt file2.txt > newjoinfile.txt
//..this will direct
the output of joined files
into a new file newjoinfile.txt
containing the same
output as the example
above..//
Options
for join command:
1. -a FILENUM : Also, print unpairable lines from file
FILENUM, where FILENUM is 1 or 2, corresponding to FILE1 or FILE2.
2. -e EMPTY : Replace missing input fields with
EMPTY.
3. -i - -ignore-case : Ignore differences in case
when comparing fields.
4. -j FIELD : Equivalent to "-1 FIELD -2 FIELD".
5. -o FORMAT : Obey FORMAT while constructing
output line.
6. -t CHAR : Use CHAR as input and output field
separator.
7. -v FILENUM : Like -a FILENUM, but suppress
joined output lines.
8. -1 FIELD : Join on this FIELD of file 1.
9. -2 FIELD : Join on this FIELD of file 2.
10. - -check-order : Check that the input is
correctly sorted, even if all input lines are pairable.
11. - -nocheck-order : Do not check that the input
is correctly sorted.
12. - -help : Display a help message and exit.
13. - -version : Display version information and
exit.
Using join with options
1. using -a FILENUM option : Now, sometimes it is
possible that one of the files contain extra fields so what join command does
in that case is that by default, it only prints pairable lines. For example,
even if file file1.txt contains an extra field provided that the contents of
file2.txt are same then the output produced by join command would be same:
//displaying the
contents of file1.txt//
$cat file1.txt
1 AAYUSH
2 APAAR
3 HEMANT
4 KARTIK
5 DEEPAK
//displaying contents
of file2.txt//
$cat file2.txt
1 101
2 102
3 103
4 104
//using join command//
$join file1.txt file2.txt
1 AAYUSH 101
2 APAAR 102
3 HEMANT 103
4 KARTIK 104
// although file1.txt
has extra field the
output is not affected
cause the 5 column in
file1.txt was
unpairable with any in file2.txt//
What if such unpairable lines are
important and must be visible after joining the files. In such cases we can
use -a option with join command which will help in
displaying such unpairable lines. This option requires the user to pass a file
number so that the tool knows which file you are talking about.
//using join with -a
option//
//1 is used with -a to
display the contents of
first file passed//
$join file1.txt file2.txt -a 1
1 AAYUSH 101
2 APAAR 102
3 HEMANT 103
4 KARTIK 104
5 DEEPAK
//5 column of first
file is
also displayed with
help of -a option
although it is
unpairable//
2. using -v option : Now, in case you only want to print
unpairable lines i.e suppress the paired lines
in output then -v option is used with join
command.
This option works exactly the way -a works(in terms of 1 used with -v in
example below).
//using -v option with
join//
$join file1.txt file2.txt -v 1
5 DEEPAK
//the output only
prints unpairable lines found
in first file passed//
3. using -1, -2 and -j option : As we already know that join combines lines
of files on a common field, which is first field by default.However, it is not
necessary that the common key in the both files always be the first column.join
command provides options if the common key is other than the first column.
Now, if you want the second field of either file or both the files to be the
common field for join, you can do this by using the -1 and -2 command line
options. The -1 and -2 here represents he first and second file and these
options requires a numeric argument that refers to the joining field for the
corresponding file. This will be easily understandable with the example below:
//displaying contents
of first file//
$cat file1.txt
AAYUSH 1
APAAR 2
HEMANT 3
KARTIK 4
//displaying contents
of second file//
$cat file2.txt
101 1
102 2
103 3
104 4
//now using join
command //
$join -1 2 -2 2 file1.txt file2.txt
1 AAYUSH 101
2 APAAR 102
3 HEMANT 103
4 KARTIK 104
//here -1 2 refers to
the use of 2 column of
first file as the
common field and -2 2
refers to the use of 2
column of second
file as the common
field for joining//
So, this is how we can use different
columns other than the first as the common field for joining.
In case, we have the position of common field same in both the files(other than
first) then we can simply replace the part -1[field] -2[field] in
the command with -j[field]. So, in the above case
the command could be:
//using -j option with
join//
$join -j2 file1.txt file2.txt
1 AAYUSH 101
2 APAAR 102
3 HEMANT 103
4 KARTIK 104
4. using -i option : Now, other thing about join command is that
by default, it is case sensitive. For example, consider the following examples:
//displaying contents
of file1.txt//
$cat file1.txt
A AAYUSH
B APAAR
C HEMANT
D KARTIK
//displaying contents
of file2.txt//
$cat file2.txt
a 101
b 102
c 103
d 104
Now, if you try joining these two
files, using the default (first) common field, nothing will happen. That's
because the case of field elements in both files is different. To make join
ignore this case issue, use the -i command line option.
//using -i option with
join//
$join -i file1.txt file2.txt
A AAYUSH 101
B APAAR 102
C HEMANT 103
D KARTIK 104
5. using - -nocheck-order option : By default, the join command checks whether
or not the supplied input is sorted, and reports if not. In order to remove
this error/warning then we have to use - -nocheck-order command like:
//syntax of join with
--nocheck-order option//
$join --nocheck-order file1 file2
6. using -t option : Most of the times, files contain some
delimiter to separate the columns. Let us update the files with comma
delimiter.
$cat file1.txt
1, AAYUSH
2, APAAR
3, HEMANT
4, KARTIK
5, DEEPAK
//displaying contents
of file2.txt//
$cat file2.txt
1, 101
2, 102
3, 103
4, 104
Now, -t option is
the one we use to specify the delimiterin such cases.
Since comma is the delimiter we will specify it along with -t.
//using join with -t
option//
$join -t, file1.txt file2.txt
1, AAYUSH, 101
2, APAAR, 102
3, HEMANT, 103
4, KARTIK, 104
tr command in
Unix/Linux with examples
- Difficulty
Level : Easy
- Last Updated : 19 Feb, 2021
The tr command in UNIX is a command
line utility for translating or deleting characters. It supports a range of
transformations including uppercase to lowercase, squeezing repeating
characters, deleting specific characters and basic find and replace. It can be
used with UNIX pipes to support more complex translation. tr stands for translate.
Syntax :
$ tr [OPTION] SET1 [SET2]
Options
-c : complements the set of characters
in string.i.e., operations apply to characters not in the given set
-d : delete characters in the first set from the output.
-s : replaces repeated characters listed in the set1 with single occurrence
-t : truncates set1
Sample Commands
1. How to convert lower case to upper
case
To convert from lower case to upper case the predefined sets in tr can be used.
$cat greekfile
Output:
WELCOME TO
GeeksforGeeks
$cat greekfile | tr “[a-z]” “[A-Z]”
Output:
WELCOME TO
GEEKSFORGEEKS
or
$cat geekfile | tr “[:lower:]”
“[:upper:]”
Output:
WELCOME TO
GEEKSFORGEEKS
2. How to translate white-space to tabs
The following command will translate all the white-space to tabs
$ echo "Welcome To
GeeksforGeeks" | tr [:space:] '\t'
Output:
Welcome To
GeeksforGeeks
3. How to translate braces into
parenthesis
You can also translate from and to a file. In this example we will translate
braces in a file with parenthesis.
$cat greekfile
Output:
{WELCOME TO}
GeeksforGeeks
$ tr '{}' '()' newfile.txt
Output:
(WELCOME TO)
GeeksforGeeks
The above command will read each
character from “geekfile.txt”, translate if it is a brace, and write the output
in “newfile.txt”.
4. How to use squeeze repetition of
characters using -s
To squeeze repeat occurrences of characters specified in a set use the -s
option. This removes repeated instances of a character.
OR we can say that,you can convert multiple continuous spaces with a single
space
$ echo "Welcome To
GeeksforGeeks" | tr -s [:space:] ' '
Output:
Welcome To
GeeksforGeeks
5. How to delete specified characters
using -d option
To delete specific characters use the -d option.This option deletes characters
in the first set specified.
$ echo "Welcome To
GeeksforGeeks" | tr -d 'w'
Output:
elcome To GeeksforGeeks
6. To remove all the digits from the
string, use
$ echo "my ID is 73535" | tr
-d [:digit:]
Output:
my ID is
7. How to complement the sets using -c
option
You can complement the SET1 using -c option. For example, to remove all
characters except digits, you can use the following.
$ echo "my ID is 73535" | tr
-cd [:digit:]
Output:
73535
uniq Command
in LINUX with examples
- Difficulty
Level : Medium
- Last Updated : 17 May, 2021
The uniq command in
Linux is a command line utility that reports or filters out the repeated lines
in a file.
In simple words, uniq is the tool that helps to
detect the adjacent duplicate lines and also deletes the duplicate lines. uniq filters out the adjacent matching lines from
the input file(that is required as an argument) and writes the filtered data to
the output file .
Syntax of uniq Command :
//...syntax of uniq...//
$uniq [OPTION] [INPUT[OUTPUT]]
The syntax of this is quite easy to
understand. Here, INPUT refers to the input file
in which repeated lines need to be filtered out and if INPUT isn’t specified
then uniq reads from the standard input. OUTPUT refers to the output file in which you can
store the filtered output generated by uniq command
and as in case of INPUT if OUTPUT isn’t specified then uniq writes to the standard output.
Now, let’s understand the use of this
with the help of an example. Suppose you have a text file named kt.txt which
contains repeated lines that needs to be omitted. This can simply be done with
uniq.
//displaying contents
of kt.txt//
$cat kt.txt
I love music.
I love music.
I love music.
I love music of Kartik.
I love music of Kartik.
Thanks.
Now, as we can see that the above
file contains multiple duplicate lines. Now, lets’s use uniq command to remove
them:
//...using uniq
command.../
$uniq kt.txt
I love music.
I love music of Kartik.
Thanks.
/* with the use of uniq
all
the repeated lines are
removed*/
As you can see that we just used the
name of input file in the above uniq example and as we didn’t use any output
file to store the produced output, the uniq command displayed the filtered
output on the standard output with all the duplicate lines removed.
Note: uniq isn’t able to detect the duplicate lines
unless they are adjacent to each other. The content in the file must be
therefore sorted before using uniq or you can simply use sort -u instead of uniq command.
Options For uniq Command:
1. -c – -count : It
tells how many times a line was repeated by displaying a number as a prefix
with the line.
2. -d – -repeated : It
only prints the repeated lines and not the lines which aren’t repeated.
3. -D – -all-repeated[=METHOD] : It prints all duplicate lines and METHOD can
be any of the following:
·
none : Do not delimit duplicate lines at all. This
is the default.
·
prepend : Insert a blank line before each set of duplicated
lines.
·
separate : Insert a blank line between each set of
duplicated lines.
4. -f N – -skip-fields(N) : It allows you to skip N fields(a field is a
group of characters, delimited by whitespace) of a line before determining
uniqueness of a line.
5. -i – -ignore case : By default, comparisons done are case
sensitive but with this option case insensitive comparisons can be made.
6. -s N – -skip-chars(N) : It doesn’t compares the first N characters of
each line while determining uniqueness. This is like the -f option, but it
skips individual characters rather than fields.
7. -u – -unique : It
allows you to print only unique lines.
8. -z – -zero-terminated : It will make a line end with 0 byte(NULL),
instead of a newline.
9. -w N – -check-chars(N) : It only compares N characters in a line.
10. – – help : It
displays a help message and exit.
11. – – version : It
displays version information and exit.
Examples of uniq with Options
1. Using -c option : It tells the number of times a line was
repeated.
//using uniq with -c//
$uniq -c kt.txt
3 I love music.
1
2 I love music of
Kartik.
1
1 Thanks.
/*at the starting of
each
line its repeated
number is
displayed*/
2. Using -d option :
It only prints the repeated lines.
//using uniq with -d//
$uniq -d kt.txt
I love music.
I love music of Kartik.
/*it only displayed one
duplicate line per group*/
3. Using -D option : It also prints only duplicate lines but not
one per group.
//using -D option//
$uniq -D kt.txt
I love music.
I love music.
I love music.
I love music of Kartik.
I love music of Kartik.
/* all the duplicate
lines
are displayed*/
4. Using -u option : It prints only the unique lines.
//using -u option//
$uniq -u kt.txt
Thanks.
/*only unique lines are
displayed*/
5. Using -f N option : As told above, this allows the N fields to be
skipped while comparing uniqueness of the lines. This option is helpful when
the lines are numbered as shown in the example below:
//displaying contents
of f1.txt//
$cat f1.txt
1. I love music.
2. I love music.
3. I love music of
Kartik.
4. I love music of
Kartik.
//now using uniq with
-f N option//
$uniq -f 2 f1.txt
1. I love music.
3. I love music of
Kartik.
/*2 is used cause we
needed to
compare the lines after
the
numbering 1,2.. and
after dots*/
6. Using -s N option : This is similar to -f N option but it skips N
characters but not N fields.
//displaying content of
f2.txt//
$cat f2.txt
#%@I love music.
^&(I love music.
*-!@thanks.
#%@!thanks.
//now using -s N
option//
$uniq -s 3 f2.txt
#%@I love music.
*-!@thanks.
#%@!thanks.
/*lines same after
skipping
3 characters are
filtered*/
7. Using -w option : Similar to the way of skipping characters, we
can also ask uniq to limit the comparison to a set number of characters. For
this, -w command line option is used.
//displaying content of
f3.txt//
$cat f3.txt
How it is possible?
How it can be done?
How to use it?
//now using -w option//
$uniq -w 3 f3.txt
How
/*as the first 3
characters
of all the 3 lines are
same
that's why uniq treated
all these
as duplicates and gave
output
accordingly*/
8. Using -i option : It is used to make the comparison
case-insensitive.
//displaying contents
of f4.txt//
$cat f4.txt
I LOVE MUSIC
i love music
THANKS
//using uniq command//
$uniq f4.txt
I LOVE MUSIC
i love music
THANKS
/*the lines aren't
treated
as duplicates with
simple
use of uniq*/
//now using -i option//
$uniq -i f4.txt
I LOVE MUSIC
THANKS
/*now second line is
removed
when -i option is
used*/
9. Using -z option : By default, the output uniq produces is
newline terminated. However, if you want, you want to have a NULL terminated
output instead (useful while dealing with uniq in scripts). This can be made
possible using the -z command line option.
Syntax:
//syntax of using uniq
with -z option//
$uniq -z file-name
grep command
in Unix/Linux
- Difficulty
Level : Easy
- Last Updated : 23 Jul, 2021
The grep filter searches a file for a
particular pattern of characters, and displays all lines that contain that
pattern. The pattern that is searched in the file is referred to as the regular
expression (grep stands for globally search for regular expression and print
out).
Syntax:
grep [options] pattern [files]
Options Description
-c :
This prints only a count of the lines that match a pattern
-h :
Display the matched lines, but do not display the filenames.
-i :
Ignores, case for matching
-l :
Displays list of a filenames only.
-n :
Display the matched lines and their line numbers.
-v :
This prints out all the lines that do not matches the pattern
-e exp :
Specifies expression with this option. Can use multiple times.
-f file :
Takes patterns from file, one per line.
-E :
Treats pattern as an extended regular expression (ERE)
-w :
Match whole word
-o :
Print only the matched parts of a matching line,
with each such part on a separate output line.
-A n : Prints searched line and nlines after the result.
-B n :
Prints searched line and n line before the result.
-C n :
Prints searched line and n lines after before the result.
Sample Commands
Consider the below file as an
input.
$cat > geekfile.txt
unix is great os. unix
is opensource. unix is free os.
learn operating system.
Unix linux which one
you choose.
uNix is easy to
learn.unix is a multiuser os.Learn unix .unix is a powerful.
1. Case insensitive search : The -i option enables to search for a string case
insensitively in the give file. It matches the words like “UNIX”, “Unix”,
“unix”.
$grep -i "UNix" geekfile.txt
Output:
unix is great os. unix
is opensource. unix is free os.
Unix linux which one
you choose.
uNix is easy to learn.unix
is a multiuser os.Learn unix .unix is a powerful.
2. Displaying the count of number of
matches : We can find the number of lines
that matches the given string/pattern
$grep -c "unix" geekfile.txt
Output:
2
3. Display the file names that matches
the pattern : We can just display the files that
contains the given string/pattern.
$grep -l "unix" *
or
$grep -l "unix" f1.txt f2.txt
f3.xt f4.txt
Output:
geekfile.txt
4. Checking for the whole words in a file
: By default, grep matches the given
string/pattern even if it found as a substring in a file. The -w option to grep
makes it match only the whole words.
$ grep -w "unix" geekfile.txt
Output:
unix is great os. unix
is opensource. unix is free os.
uNix is easy to
learn.unix is a multiuser os.Learn unix .unix is a powerful.
5. Displaying only the matched pattern
: By default, grep displays the entire
line which has the matched string. We can make the grep to display only the
matched string by using the -o option.
$ grep -o "unix" geekfile.txt
Output:
unix
unix
unix
unix
unix
unix
6. Show line number while displaying
the output using grep -n : To
show the line number of file with the line matched.
$ grep -n "unix" geekfile.txt
Output:
1:unix is great os.
unix is opensource. unix is free os.
4:uNix is easy to
learn.unix is a multiuser os.Learn unix .unix is a powerful.
7. Inverting the pattern match : You can display the lines that are not matched with
the specified search sting pattern using the -v option.
$ grep -v "unix" geekfile.txt
Output:
learn operating system.
Unix linux which one
you choose.
8. Matching the lines that start with a
string : The ^ regular expression pattern specifies
the start of a line. This can be used in grep to match the lines which start
with the given string or pattern.
$ grep "^unix" geekfile.txt
Output:
unix is great os. unix
is opensource. unix is free os.
9. Matching the lines that end with a
string : The $ regular expression pattern
specifies the end of a line. This can be used in grep to match the lines which
end with the given string or pattern.
$ grep "os$" geekfile.txt
10.Specifies expression with -e option.
Can use multiple times :
$grep –e "Agarwal" –e
"Aggarwal" –e "Agrawal" geekfile.txt
11. -f file option Takes patterns from
file, one per line.
$cat pattern.txt
Agarwal
Aggarwal
Agrawal
$grep –f
pattern.txt geekfile.txt
12. Print n specific lines from a file: -A prints the
searched line and n lines after the result, -B prints the searched line and n
lines before the result, and -C prints the searched line and n lines after and
before the result.
Syntax:
$grep -A[NumberOfLines(n)] [search]
[file]
$grep -B[NumberOfLines(n)] [search]
[file]
$grep -C[NumberOfLines(n)] [search]
[file]
Example:
$grep -A1 learn geekfile.txt
Output:
learn operating
system.
Unix linux which one
you choose.
--
uNix is easy to learn.unix is a multiuser os.Learn unix .unix is a
powerful.
(Prints the searched line along with
the next n lines (here n = 1 (A1).)
(Will print each and every occurrence
of the found line, separating each output by --)
(Output pattern remains the same for -B
and -C respectively)
@Mr_MonArch
Comments
Post a Comment